What You'll Need
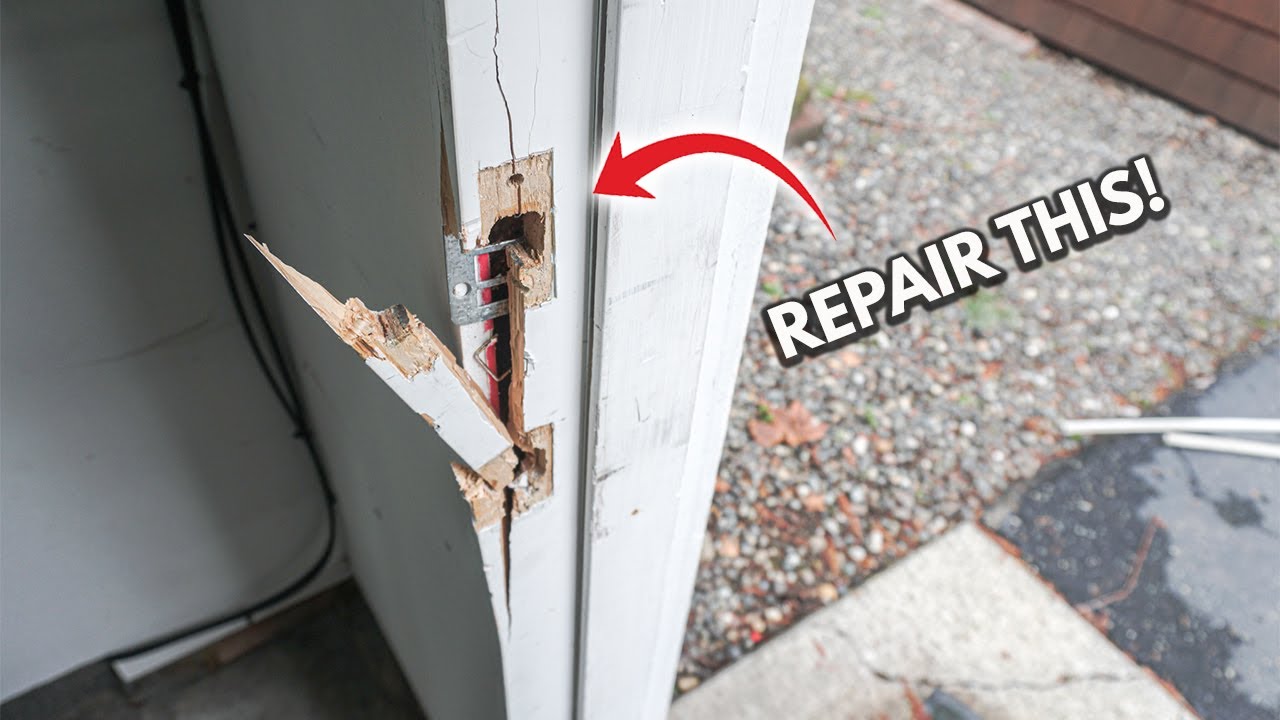
I had a door jamb that was completely shot. The left side where all the strike plates mount was cracked, the deadbolt plate was splitting, and the whole thing was loose. Instead of paying someone to fix it, I replaced it myself. Here's exactly how I did it.
- Pry bar and rubber mallet
- Reciprocating saw with metal-cutting blade (or hacksaw)
- Table saw or circular saw
- Miter saw
- Brad nailer (18 gauge, 2-inch nails)
- Drill and impact driver
- 2.5-inch wood screws
- Spade bit (5/8 inch)
- Chisel (1/2 inch)
- Oscillating multi-tool (optional, but helpful)
- Mechanical pencil
- 3/32-inch drill bit
- New door jamb lumber
- Weather stripping
- Door strike plate and deadbolt plate hardware
Step 1: Remove Weather Stripping and Hardware
First, pull out all the weather stripping around the door jamb. If yours doesn't have any, skip this. I just pulled mine out completely since I was replacing it anyway.
Next, remove all the hardware — the deadbolt mechanism, the door strike plate, and any security sensors. Save all the screws and pieces. There's no reason to buy new hardware if the old stuff still works fine.
Step 2: Pry Off the Old Door Jamb
Get your pry bar and rubber mallet. I started by prying from one side, being careful not to mess up the door casing on the outside. The old jamb was already cracked, so it came off pretty easily.
If your jamb is nailed into the framing, you'll need to cut through those nails. You can use a handheld hacksaw, but that takes forever. I used a reciprocating saw with a metal-cutting blade — cuts through nails like butter. Just be careful with that thing.
Try to save the door stop strip (the thin piece that stops the door from swinging through), but in my case it was too damaged to reuse.
Step 3: Clean Out the Void and Add Fillers
Vacuum out all the debris. My old jamb had a half-inch gap behind it that was filled with shims. I replaced those with solid half-inch wood cut on my table saw.
Cut your filler pieces to size, place them in the void, and screw them in. Drill pilot holes first or you'll crack the wood. I used 2.5-inch general purpose wood screws, placing them from top to bottom and in the middle. Don't worry about making it look pretty — it just needs to be flush with the drywall and exterior siding.
Step 4: Measure and Cut the New Door Jamb
Take measurements from your old jamb. I got a piece of half-inch lumber from Lowe's that already had a notch cut into it, but I didn't need that notch for this replacement. Just cut it to length with your miter saw.
Test fit it against the door frame. If it fits, tap it in with your rubber mallet and secure it with 2.5-inch wood screws. Again, drill pilot holes first. Place screws at the top, bottom, and two in the middle — that's four total. The screws will be hidden behind the door stop you'll install later.
Step 5: Make the Weather Stripping Channel
If your new door stop doesn't have a channel for weather stripping (mine didn't), you need to cut one. Set your table saw depth to half an inch and the fence so the cut is about a quarter inch from the edge. Test on scrap first — don't risk your final piece.
Cut the channel in your door stop piece, then test-fit the weather stripping. It should snap right in.
Step 6: Install the Door Stop
Measure and cut the door stop to match the top frame. Attach it with your brad nailer using 18-gauge, 2-inch nails. I used a Works nail force nailer — it's quiet and handy. Place about six brad nails to secure it to the stud.
Important: Install the weather stripping before you mark your door knob holes. If you don't, you'll push the door stop further out and mark the holes wrong.
Step 7: Mark and Cut Door Knob and Deadbolt Holes
Here's a trick: extend your mechanical pencil lead as far as it will go. This lets you reach between the door and jamb to trace exactly where the door knob and deadbolt will hit. Mark the strike plate outline, the deadbolt hole, and everything else.
For the door knob strike: use a 5/8-inch spade bit to drill a shallow hole — not all the way through. Then chisel out the rest to the correct depth. Trace the strike plate again, then use a chisel (or oscillating tool if you're steady) to recess the plate about 1/16 inch deep — just the thickness of the plate.
Drill pilot holes with a 3/32-inch bit before screwing in the strike plate hardware. If you skip this step, you'll crack the wood.
For the deadbolt: repeat the same process. The deadbolt hole needs to go all the way through since the bolt extends deeper. I used a chisel for this one since the oscillating tool was too tight in that spot.
Step 8: Test Everything
Mount your strike plate and deadbolt plate. The door should close smoothly and latch properly. If it doesn't, check your alignment and make adjustments.
That's it. Your door jamb is replaced, the hardware is mounted, and you saved yourself a service call.