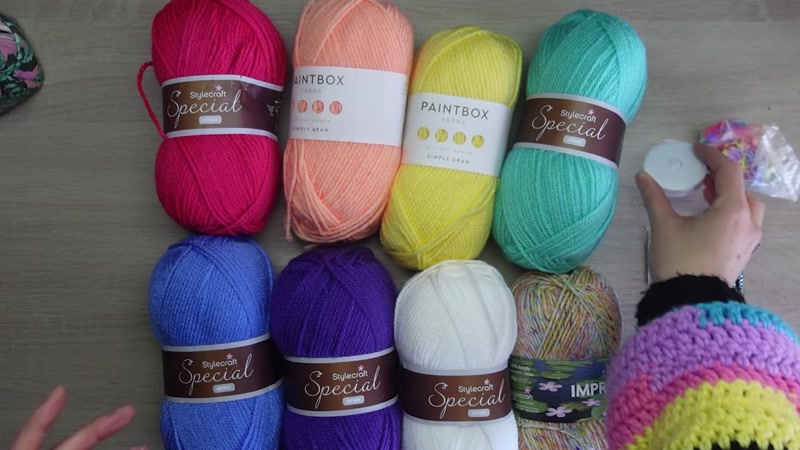
What You'll Need
Here is the DIY tutorial based on your provided transcript.
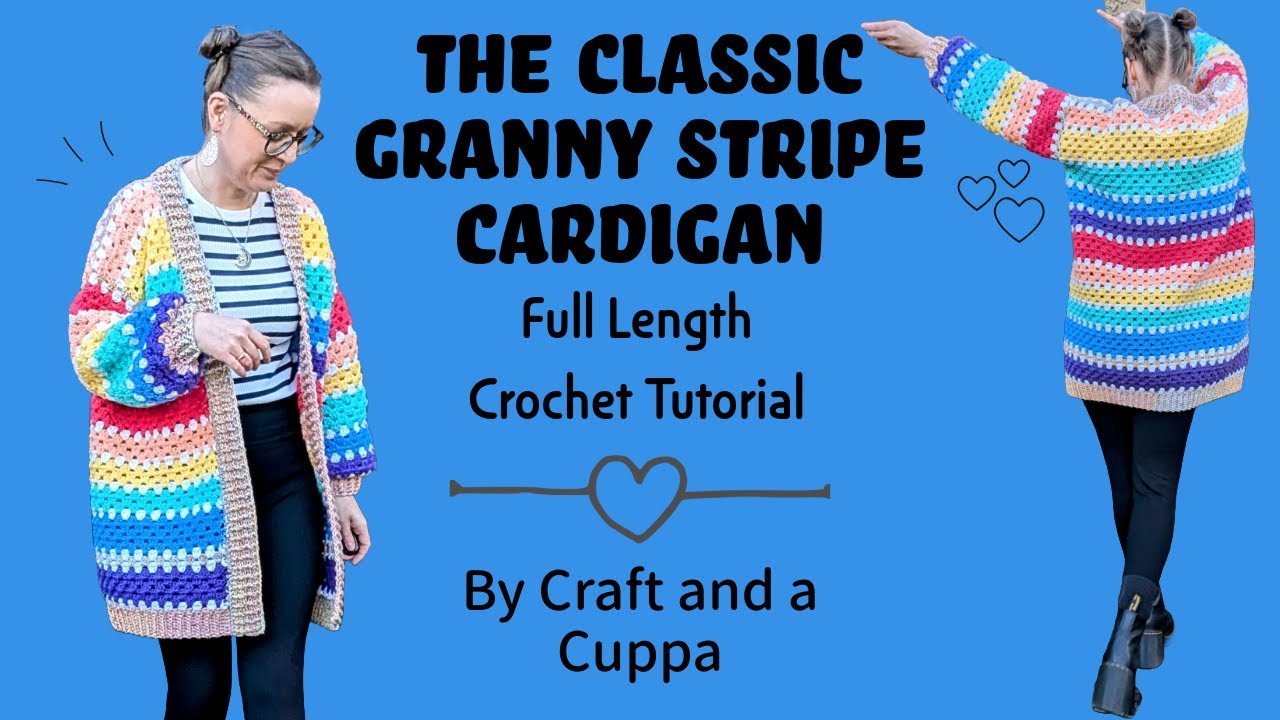
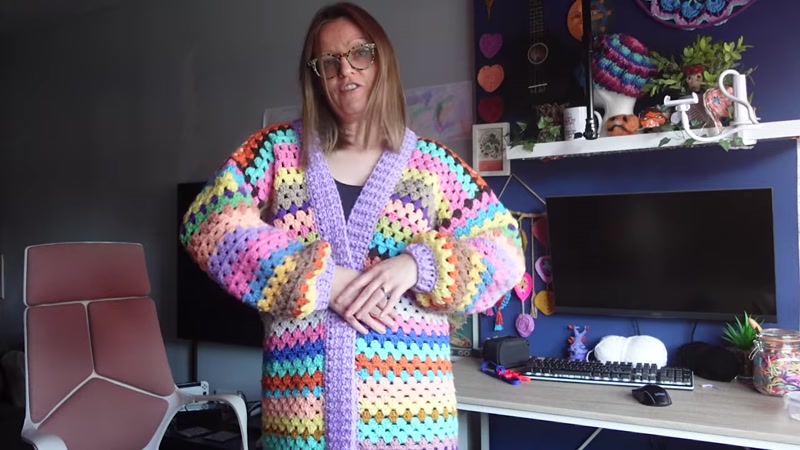
# How to Make a Classic Granny Stitch Cardigan
This oversized, cozy cardigan is worked from the bottom up in one large panel, making it a great project for beginners and seasoned crocheters alike. The pattern is "made to measure," so you can customize it to your size and use any yarn weight you like. This tutorial will guide you through the ribbing, the granny stitch body, the sleeves, and the finishing neckline.
- Yarn: Any weight (Aran/ worsted weight is recommended for a chunky feel). You will need approximately 5-7 skeins (depending on size and yarn weight). This pattern is perfect for using up scrap yarn.
- Crochet Hook: A size appropriate for your yarn. A 6mm hook was used in the tutorial for Aran weight yarn.
- Tape Measure: Essential for taking your measurements.
- Stitch Markers: For marking armholes and panel sections.
- Yarn Needle: For weaving in ends.
- Scissors: For cutting yarn.
Step-by-Step Guide
1. Make the Bottom Ribbing

The cardigan starts with a stretchy ribbing band worked in rows.
- Chain your foundation: Make a chain that is about 6 cm (2.5 inches) long. This will be the depth of your ribbing. The number of chains does not need to be odd or even. The tutorial used a chain of 8 for a 6cm depth.
- Row 1: Chain 1 (this does not count as a stitch). Work 1 single crochet (sc) into the second chain from the hook and into every chain across. Turn.
- Row 2 (and all subsequent rows): Chain 1. Work 1 sc into the back loop only of every stitch across. Turn.
- Repeat Row 2 until the ribbing band is the correct length for your size. To measure, lay the ribbing flat (do not stretch it) against your tape measure. The length you need will be the full width of your cardigan around your hips/waist. The tutorial provides measurements for a size small, but you should measure yourself. For example, if you want a 94cm (37-inch) wide cardigan, crochet until your band is 94cm long.
2. The Foundation Row (Single Crochet Edge)

This row transitions from the ribbing to the granny stitch pattern.
- With the right side of the ribbing facing you, chain 1.
- Work 1 sc evenly along the long edge of the ribbing. A good rule of thumb is to work 1 sc into the top of each ribbing row.
- Crucial Step: Count your stitches. The total number must be a multiple of 3 + 1 extra stitch. For example, 117 is a multiple of 3, so you would need 118 stitches total. If your count is not correct, you can add an extra sc or skip a stitch at the end to make it work.
3. The Granny Stitch Body (The Main Panel)
You will now work the main body of the cardigan by repeating two simple rows. You will work these rows back and forth until the panel is the desired length (from your underarm down).
- Row 1 (The "Base" Row - starts and ends with 2 dc):
- Chain 3 (counts as your first double crochet). Turn your work.
- Place 1 dc in the same stitch as the chain 3 (you now have 2 dc in the first stitch).
- Skip the next 2 stitches. In the 3rd stitch, work 3 double crochets (dc).
- Repeat to across the row.
- At the end, you will have 3 stitches left. Skip 2 stitches and work 2 dc into the very last stitch.
- Row 2 (The "Standard" Row - starts and ends with 1 dc):
- Chain 3 (counts as your first dc). Turn your work.
- This row is worked into the gaps between the clusters of 3 dc from the previous row.
- Skip the first 2 dc stitches. Work 3 dc into the first gap.
- Work 3 dc into every gap across the row.
- At the end, skip the last dc stitch and work 1 dc into the top of the turning chain (the chain 3 from the start of the previous row).
- Repeating the Pattern:
- Row 3: Repeat Row 1 (starts and ends with 2 dc).
- Row 4: Repeat Row 2 (starts and ends with 1 dc).
- Continue repeating Rows 3 and 4 until your panel measures the desired length from the ribbing to your underarm. The tutorial recommends 60 cm (24 inches) for a thigh-length cardigan. Important: Your last row before starting the armhole sections must be a Row 4 (the one that starts and ends with 1 dc).
4. Separating the Panels (Armholes)

Now you will divide your large panel into three sections: the two front panels and the back panel.
- Lay your panel flat. You will need to create armholes by marking off the front panels.
- Find your front panel width: Measure from the edge of your panel inward. The tutorial uses 18 cm (7 inches) for a size small. Place a stitch marker in the gap closest to this measurement.
- Mark the other side: From the opposite edge, measure in the same distance (18 cm) and place another stitch marker in the gap.
- Mark the back panel: Place a stitch marker in the gap directly next to each of the markers you just placed (moving towards the center). This marks the start and end of the back panel. The remaining stitches between these two new markers are the back panel.
5. Working the Front and Back Panels
You will now work each of the three sections separately, using the stitch markers as the ends of your rows.
- Front Panel 1: Working on the edge of your panel, begin at the edge marker and work across to the first marker you placed for the front panel. Use the same Row 3/Row 4 pattern. Tip: If you are using scrap yarn, work all three panels at the same time (a few rows on each) to ensure you have enough yarn for a consistent look.
- Back Panel: Attach yarn at the marker that starts the back panel and work across to the other back panel marker. Use the same Row 3/Row 4 pattern.
- Front Panel 2: Attach yarn at the marker for the second front panel and work across to the edge of your panel. Use the same Row 3/Row 4 pattern.
- Measure: Continue adding rows until each panel reaches the desired height for your shoulder. The tutorial uses 18.5 cm (7.25 inches) for a size small. All three panels must have the same number of rows. Leave a long tail of yarn on each panel for seaming.
6. Seaming the Shoulders

- Fold your cardigan so the right sides are touching and the wrong side is facing out.
- Line up the top of a front panel with the top of the back panel.
- Using your long tail or a new piece of yarn, slip stitch through both layers across the top edge of the panel. Do not pull your slip stitches too tight.
- Repeat for the other shoulder.
7. The Sleeves

The sleeves are worked in the round directly from the armhole.
- Turn your cardigan right side out.
- Attach your yarn with a slip stitch in the gap at the underarm (between the front and back panels).
- Round 1: Chain 3. Work 2 more dc into the same gap (this is your first cluster). Now, you will work clusters around the edge of the armhole. To do this, skip one "dc bar" (the post of the double crochet at the end of a row) and work 3 dc around the next dc bar. Repeat this all the way around the armhole. When you reach the shoulder seam, work a 3-dc cluster into the seam itself. Continue mirroring the pattern down the other side. At the end, join with a slip stitch to the top of the beginning chain 3.
- Round 2 (and all subsequent rounds): Chain 3. Work 2 dc in the same gap. Then, work 3 dc into every gap around. Turn your work after each round to keep the stitch pattern consistent. Join at the end of each round.
- Continue working rounds until the sleeve is your desired length. The tutorial recommends 40 cm (16 inches) from the underarm for a size small.
8. The Sleeve Cuffs

- Decrease Round: To make the cuff narrower, work a round of single crochet 2 together (sc2tog) in every stitch all around. You need an even number of stitches at the end of this round. Join with a slip stitch.
- Set-up Round: Chain 3 (counts as 1 dc). Work 1 dc in every stitch around. Join.
- Ribbing Round: Chain 1. Work 1 front post double crochet (fpdc) around the first stitch. Work 1 back post double crochet (bpdc) around the next stitch. Repeat fpdc, bpdc around. Join with a slip stitch to the first fpdc.
- Repeat this ribbing round until the cuff is the desired length. The tutorial used 3 rounds.
9. The Neckline

This is the final step and it transforms the cardigan, giving it shape and structure.
- Row 1 (Single Crochet Round): With the right side facing you, start at the bottom left edge of the cardigan. Chain 1. Work 1 sc into the same stitch. Work 1 sc evenly along the ribbing. When you reach the granny stitch section, alternate between working 1 sc around a dc bar and 2 sc around the next dc bar. Continue this alternating pattern up the front, across the back neck (working 1 sc in every stitch), and down the other front. Important: Your total stitch count for this row must be an odd number. You may need to add or skip a stitch at the end to achieve this. Turn.
- Row 2 (Half Double Crochet Row): Chain 1 (does not count as a stitch). Work 1 half double crochet (hdc) in the first stitch and in every stitch across. Turn.
- Row 3 (Ribbing Row 1): Chain 1. Work 1 hdc in the first stitch. Then, work 1 fpdc around the next stitch, 1 bpdc around the next stitch. Repeat from to across. Your last stitch should be a hdc. Turn.
- Row 4 (Ribbing Row 2): Chain 1. Work 1 hdc in the first stitch. Work 1 bpdc, 1 fpdc across (opposite of the previous row so the ridges line up). End with a hdc. Turn.
- Repeat Rows 3 and 4 until the neckline is the depth you desire. The tutorial recommends about 6 cm (2.5 inches) deep for a nice, structured finish.
- Fasten off and weave in all ends.
Tips for Success
- Don't stress about perfection: The granny stitch is very forgiving. If you accidentally put 2 or 4 dc in a gap instead of 3, it will not be noticeable in the finished garment.
- Use stitch markers: They are essential for keeping track of your front and back panels and the armholes.
- Work panels simultaneously: If you are using scrap yarn, work a few rows on each panel (front, back, front) before moving to a new color. This ensures a balanced distribution of colors and yarn usage.
- Try it on: The neckline is the "ugly phase" buster. Don't judge the fit of the cardigan until you have added the neckline. It pulls everything together.
- Leave long tails: When you finish a panel or sleeve, leave a long tail (approx. 20-30 cm) of yarn for seaming. This saves you from having to weave in extra ends.


