How to Design a Drip Irrigation System for Your Garden
Okay, let's turn that detailed video transcript into a clear, actionable DIY tutorial.
Designing a drip irrigation system might look complicated, but it's really just a matter of planning. With a simple sketch and a few measurements, you can create a custom watering plan that will save you time and keep your garden healthy. This guide will walk you through the process step-by-step, using a raised bed garden as our example.
What You'll Need
- Writing Utensils: A pen or pencil and colored pens or highlighters (optional, but helpful).
- Graph Paper or Plain Paper: For sketching your garden layout.
- Measuring Tape: To measure distances and bed sizes.
- A Bucket and Timer: Optional, but recommended for testing your water source's flow rate.
Step-by-Step Guide
Step 1: Gather Your Basic Information
Start by identifying your water source. For most home gardens, this will be a standard outdoor hose bib (spigot).
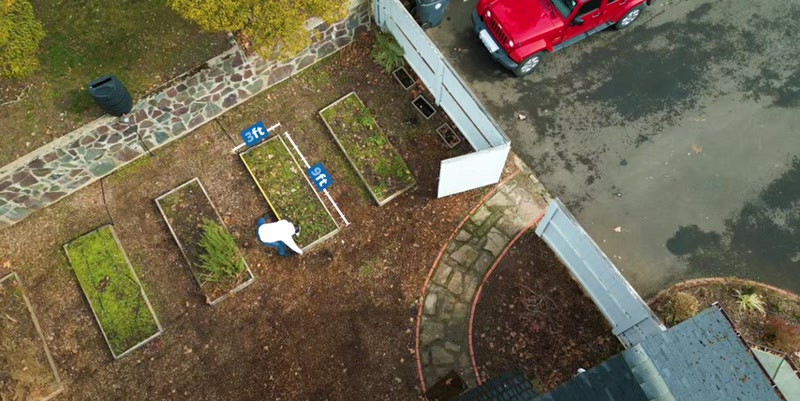
- Measure the distance from your water source to the furthest plant that needs water. Write this number down.
- If you have raised beds or in-ground beds, measure their length and width. Write these down too. You'll need these measurements later to calculate how much tubing you need.
Step 2: Choose Your Emitter Type
The "emitter" is the part that actually delivers water to your plants. The best type depends on what you're growing.
- Sprayers or Bubblers: Good for ground covers or propagation beds.
- Individual Drippers: Best for potted plants or widely spaced plants.
- Drip Line (1/4-inch): Ideal for raised beds with rows of plants. This is what we'll use in our example.
- Drip Tape: Best for long rows of row crops like vegetables.
For this tutorial, we'll focus on raised beds with a few rows of plants, so we'll use 1/4-inch drip line as our primary emitter.
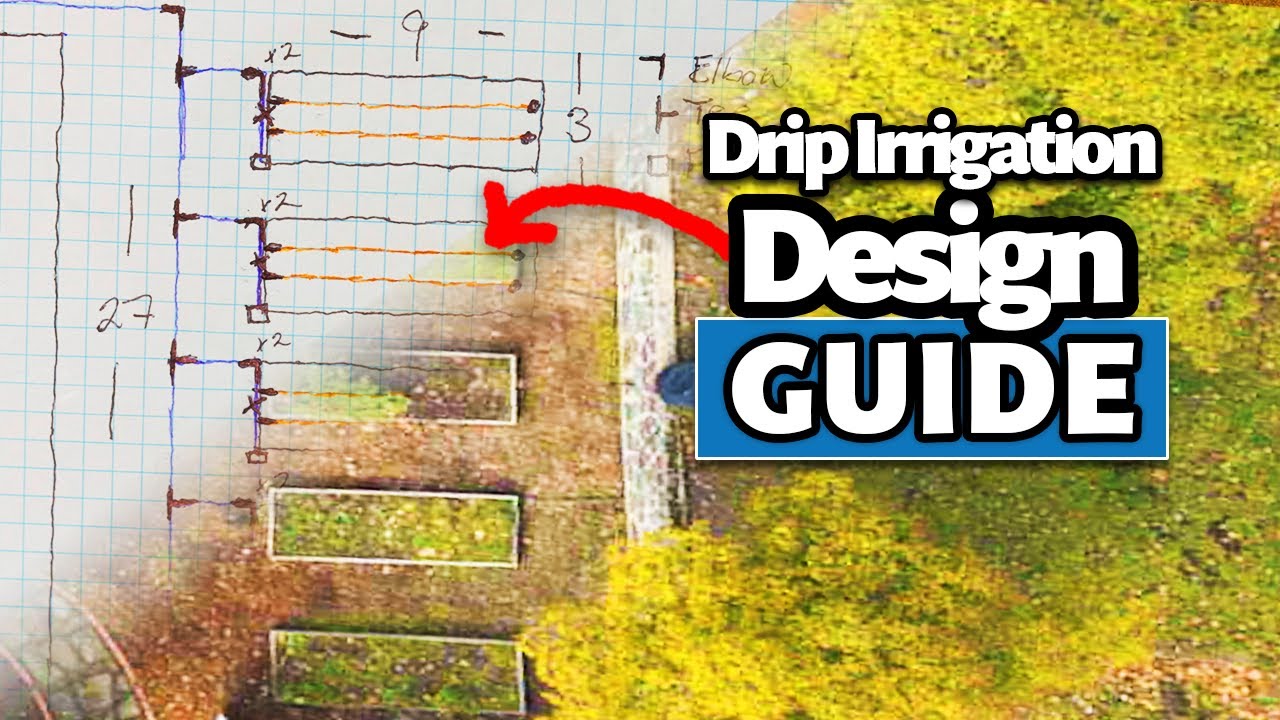
Step 3: Create a Sketch of Your Garden

This is the most important step. A simple drawing will help you visualize the entire system.
- Draw your garden layout: Include your beds, pathways, and any obstacles like rocks or furniture.
- Mark your water source: Draw a clear symbol (like a faucet) where your hose bib is.
- Add your measurements: Write the length and width of each bed, and the distance from the water source to the furthest bed.
Step 4: Draw Your Mainline Tubing

The mainline is the main artery of your system, usually 1/2-inch tubing.
- Start at your water source. Draw a line from the faucet to the area you need to water.
- Route the mainline to the furthest point in your garden, keeping it clear of obstacles. Use a different color pen for this line so it stands out.
Step 5: Draw Your Emitters and Fittings

Now, add the details.
- Draw your emitter lines: In our example, this is the 1/4-inch drip line. Draw a line for each row of plants in your beds.
- Draw your fittings: Fittings are the connectors. Use symbols or a tally to keep track of them.
- Tees (T's): Where your mainline splits into three directions.
- Elbows: Where your tubing makes a 90-degree turn.
- End Caps: Where a line of mainline or drip line ends.
- Coupling Valves: Optional, but great for turning off individual beds.
- Goof Plugs: Small plugs used to cap the end of a 1/4-inch drip line.
- 1/4-inch Couplings: Connect the 1/4-inch drip line to the 1/2-inch mainline.
- 1/2-inch Couplings: Useful for repairs if you make a bad cut.
Step 6: Count Your Fittings

Using your sketch, make a list of every fitting you've drawn.
- Tees: Count each spot where the mainline splits.
- Elbows: Count every 90-degree turn, including the ones going up and over into your beds.
- End Caps: Count the number of mainline runs that end (usually one per bed).
- Coupling Valves: Count one for each bed you want to control individually.
- Goof Plugs: Count one for each run of drip line.
- 1/4-inch Couplings: Count one for each connection between drip line and mainline.
- 1/2-inch Couplings: Buy a couple extra for potential repairs.
Step 7: Calculate Your Tubing Lengths

Use your written measurements to figure out how much tubing you need.
- Mainline (1/2-inch): Add up the total linear feet from your water source to the furthest point, including any runs to each bed and across the top of each bed. Always round up to the next standard roll size (e.g., 50, 100, 200 feet).
- Drip Line (1/4-inch): Multiply the length of one row by the number of rows per bed, then multiply by the number of beds. Round up to the next roll size.
Step 8: Check Your Water Source (Optional but Recommended)

This step ensures your system will work properly.
- Test your flow rate: Use a bucket and a timer to see how many gallons per minute (GPM) your hose bib puts out. Convert this to gallons per hour (GPH) by multiplying by 60.
- Calculate your system's demand: Add up the GPH of all your emitters. For example, 90 feet of drip line with emitters every 12 inches at 0.5 GPH each equals 45 GPH.
- Compare: Your water source should provide at least as much GPH as your system demands. Most residential spigots can easily handle 45 GPH.
Step 9: Choose Your Mainline Size
Use the "200/200 Rule" to determine the right size for your mainline.
- 1/2-inch mainline: Good for up to 200 feet in length or 200 GPH in flow.
- 3/4-inch mainline: Good for up to 480 feet or 480 GPH.
- 1-inch mainline: Good for up to 960 feet or 960 GPH.
For most home gardens, 1/2-inch mainline is perfect.
Step 10: Plan Your Head Assembly

The head assembly connects your system to the hose bib. It must include these parts:
- Backflow Preventer: Prevents contaminated water from flowing back into your home's water supply.
- Filter: Keeps debris from clogging your emitters.
- Pressure Regulator: Reduces your home's water pressure (usually 40-60 PSI) to the safe operating pressure for drip irrigation (usually 25 PSI).
- Hose Bib to Tubing Adapter: Connects the head assembly to your mainline tubing.
- Timer (Optional): Automates your watering schedule.
Tips for Success
- Always Round Up: When buying tubing, always buy a little more than you think you need. Extra tubing is invaluable for repairs or future expansions.
- Draw in Color: Using different colored pens for the water source, mainline, and drip line makes your sketch much easier to read.
- Test Your Water Source First: Before you order any parts, test your flow rate. This is a simple step that can save you from a system that doesn't work.
- Consider Coupling Valves: Installing a valve for each bed or zone gives you incredible control. You can water only what needs it, which saves water and prevents overwatering.
- Plan for Repairs: Always include a few extra 1/2-inch couplings and 1/4-inch goof plugs in your order. They are cheap and can save a whole row of plants if you make a mistake.