What You'll Need
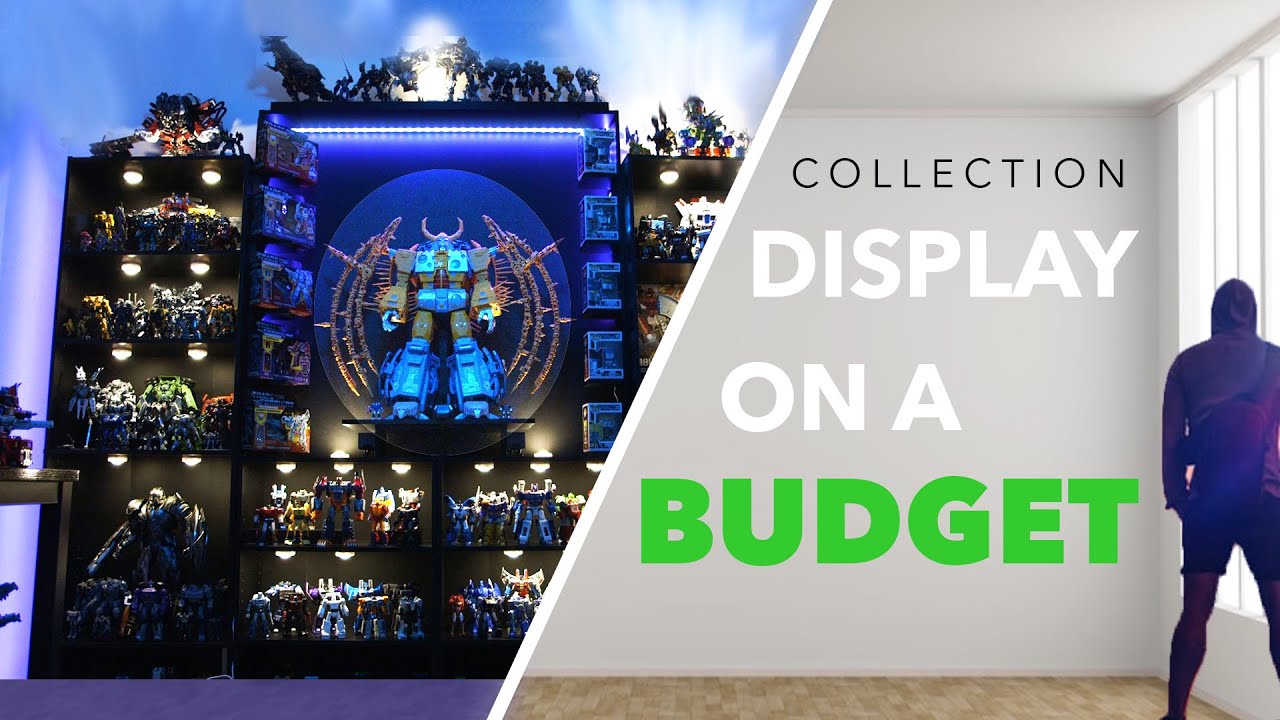
Are your prized collectibles stuck in boxes because you can't find an affordable display solution? You're not alone. Many collectors face the challenge of wanting a professional-looking display without spending thousands of dollars. In this guide, I'll show you how to create a stunning action figure display that's budget-friendly, space-efficient, and adaptable to any room.
Shelving:
- 2 Mainstays 71-inch shelf bookcases (black or white, from Walmart)
- 2 Mainstays 31-inch 3-shelf bookcases (same brand, same color)
- 1 large black floating shelf (from Amazon)
- 2 wall display shelves (from Amazon)
Lighting:
- Battery-powered puck lights (Amazon)
- Strip lights (Walmart)
- Extension cords
- Black electrical tape
Backdrop & Window Covering:
- 3 large black foam boards (from Hobby Lobby)
- Measuring tape
- Strong tape
Tools:
- Screwdriver
- Level
- Measuring tape
- Scissors or utility knife
Step-by-Step Guide
Part 1: Shelving and Lighting Setup
#### ## Step 1: Purchase and Assemble Your Shelves
Head to Walmart and pick up two Mainstays 71-inch shelf bookcases and two Mainstays 31-inch 3-shelf bookcases. Choose black or white based on your room's style. I recommend black for a professional look, but be warned—black shows dust more easily. Assemble all shelves according to the manufacturer's instructions.
Pro tip: Keep all shelves the exact same color. Mixing different shades of black or white will look unprofessional and catch the eye.
#### ## Step 2: Arrange Your Shelf Layout
Position your shelves against your main wall:
- Place the two larger 71-inch shelves on the outer sides
- Place the two smaller 31-inch shelves in between the large ones
This creates a balanced, symmetrical look that works around windows, doors, or other obstacles in your room.
#### ## Step 3: Block Out Sunlight
Sunlight is the enemy of collectibles—it causes fading and damage over time. If you have a window in your display area, cover it completely.
- Measure your window dimensions
- Purchase large black foam boards from Hobby Lobby
- Cut the foam boards to fit perfectly inside the window frame
- Use strong tape to secure the boards in place
This creates a professional, dark backdrop that makes your figures pop.
#### ## Step 4: Add Floating Shelves for the Centerpiece
To create an "orbiting" display effect around your centerpiece:
- Purchase wall display shelves from Amazon
- Mount them side by side in the middle of your display
- Place one large black floating shelf across both smaller shelves
- This completes the orbiting look around your centerpiece
Note: If you're renting and can't make large holes in walls, use adhesive mounting strips or command strips instead.
#### ## Step 5: Install Puck Lights
Battery-powered puck lights are an affordable lighting solution. However, they can be risky for large displays because you'll need many of them and will have to replace batteries every few months.
- Place one puck light on each shelf
- Space them evenly for balanced lighting
- If you have a larger display, consider wired puck lights instead
#### ## Step 6: Add Strip Lights for the Backdrop
Strip lights add that perfect finishing touch:
- Purchase strip lights from Walmart
- Run one strip from one end of your display to the other
- Run a second strip from the opposite end, meeting in the middle
- This leaves two strips hanging off both ends of the plank
- Use extension cords and black electrical tape to hide the wiring
Part 2: Figure Orientation
#### ## Step 7: Organize by Shape
If your collection has similar body types (like all G1 Transformers), this step is easy. But if you have figures with wild, different shapes (like Beast Wars characters), you need to be careful. Group similar shapes together to avoid a chaotic, messy look.
Rule of thumb: Avoid mixing figures with drastically different shapes on the same shelf.
#### ## Step 8: Organize by Size (Height)
This is where most collectors go wrong. Don't bunch figures of the same height together—you won't be able to see the ones in the back.
Three techniques for size organization:
- Large figure as centerpiece: Place one large figure on the left side and balance it with another large figure on the far right side
- Two rows with height variation: Put taller figures in the back row and shorter figures in the front row
- Use risers: If you want two rows of similar height, use a secondary shelf to lift the back row
#### ## Step 9: Organize by Color
Color is the most overlooked aspect of figure display. A balanced color scheme makes your collection look intentional and professional.
Example: On a "silver and yellow" shelf, don't put all yellow figures on one side. Place one yellow on the left, one in the middle, and one on the right for balance.
General rule: If you have a bright or highlighted figure on one side of a shelf, place a similar bright figure on the opposite side.
#### ## Step 10: Pose Your Figures Strategically
Avoid over-posing figures in cramped spaces—it looks chaotic. Instead:
- Have all figures on one shelf point their guns at the audience
- If one figure's torso is twisted to the left, twist another figure's torso to the right for balance
- Keep poses simple and consistent
Tips for Success
- Avoid mixing different figure lines on the same shelf. Bayverse Transformers and G1 Transformers don't match in style or color. Keep them separate.
- Rearrange your display every month. When you dust your shelves, take the opportunity to rearrange figures. This keeps your display fresh and interesting.
- Use what you have. Don't feel pressured to buy expensive materials. The table in my display isn't perfect, but it works for now. Function over form.
- Embrace imperfections. Not every shelf will be perfect. Sometimes small imperfections make the display look better and more personal.
- Start small. If you have limited space, use floating shelves on one wall. You can always expand later.


