What You'll Need
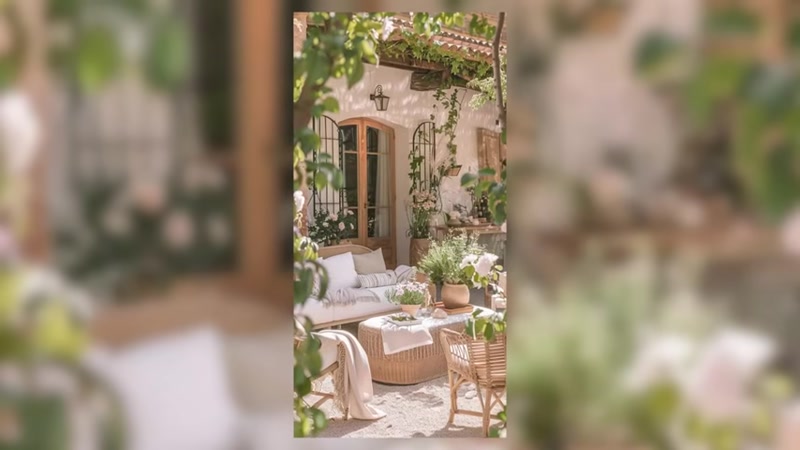
Want to breathe new life into your sad, neglected patio? This comprehensive guide walks you through refreshing your outdoor space with budget-friendly DIY projects, beautiful plants, and creative touches that will turn your patio into a lush oasis perfect for spring and summer entertaining.
Tools & Supplies:
- Broom and mop
- Garden hose with spray nozzle
- Rags or old cloths
- Spray paint (gray)
- Light gray latex paint (sample size)
- Paintbrush
- Stucco repair compound
- Garden stakes (5 pieces, ~$2 each)
- Nail gun or hammer and nails
- Siding clips (for damage-free hanging)
- Macrame cord or rope
- Scissors
- Trash bags
- Potting mix
- Biotone starter fertilizer (or similar)
- Gardening gloves
Plants:
- Herbs (basil, thyme, spearmint, oregano, sage, rosemary)
- Super tunias (saffron finch and Bordeaux varieties)
- Variegated vinca vines
- Clerodendrum (or similar climbing plant)
- Distylium
- Sedum
- Hosta (or similar shade-loving plant)
- Jade plant
- Irish moss
- Any other fillers you love
Planters & Decor:
- Large plastic planters (for DIY stone-look project)
- Terracotta pots (various sizes)
- New throw pillow covers
- Doormat
- Solar lanterns
- Camping chairs (optional, for extra seating)
- Hanging basket (for door decoration)
- Small metal greenhouse or shelf unit
Step-by-Step Guide
Step 1: Deep Clean the Patio
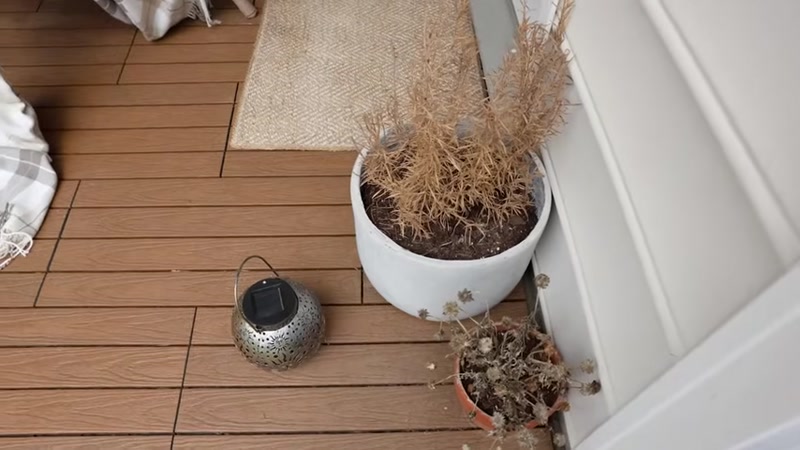
Start by removing all furniture, plants, and decor from the space. This gives you a blank canvas to work with and reveals just how much grime has accumulated over winter.
Action: Sweep the entire patio surface, then wipe down all shelves, railings, and surfaces. Follow up with a thorough mopping to remove stubborn pollen and dirt. Use your garden hose to spray down furniture frames and cushions. Let everything dry in the sun while you work on other projects.
Why it matters: Deep cleaning is the most budget-friendly way to refresh any space—it costs nothing but your time and effort, yet makes an enormous difference in how fresh and inviting your patio feels.
Step 2: Create DIY Stone-Look Planters
Large stone planters can be expensive, but you can easily transform affordable plastic planters into beautiful stone-looking pots.
Action:
- Apply stucco repair compound to your plastic planters using a rag. Work it into all the ridges and down the sides of the pot for consistent texture.
- Let the first coat dry completely, then use your rag to knock down any sharp edges.
- Spray paint the pots gray. Let dry.
- If the color is too dark, dilute light gray latex paint with water and apply a thin coat over the spray paint. This allows some of the darker color to show through for depth.
- Once dry, rub a small amount of dirt into the pots to create a worn, weathered look.
Result: Beautiful, textured planters that look like aged stone at a fraction of the cost.
Step 3: Refresh Your Hanging Planters

If you have hanging planters with worn ropes, this quick update will make them look brand new.
Action:
- Remove old, weathered rope from your hanging planters.
- Cut fresh macrame cord to your desired length.
- Tie simple knots to secure the planters—no braiding required.
- Repot your trailing plants (vinca vines work beautifully) into the refreshed hangers.
- Hang them on a blank wall to add vertical interest.
Pro tip: These vines will grow and trail down over the season, creating a stunning living curtain effect.
Step 4: Build a Custom Trellis

When you can't find a trellis in the right size, make your own in minutes.
Action:
- Measure the wall space where you want your trellis.
- Use two garden stakes as vertical pieces.
- Cut three additional stakes into horizontal slats at your desired width.
- Lay out the frame and position horizontal slats evenly spaced.
- Secure everything with a nail gun or hammer and nails.
- Don't worry about perfect precision—store-bought trellises aren't perfectly straight either.
Hanging tip: Use siding clips for damage-free installation. They hook right into siding and can hold considerable weight.
Step 5: Pot Your Plants

Now it's time to bring your greenery to life.
Action:
- Match plants to appropriate pots based on size and style.
- For the climbing plant (clerodendrum), pot it at the base of your new trellis and gently train vines upward.
- Pot herbs in terracotta pots for that classic herb garden feel.
- Use potting mix mixed with starter fertilizer to give plants a strong foundation.
- For the door basket, line with trash bags to catch water, then arrange flowers inside using smaller pots for height.
Plant pairing ideas:
- Large white planter → Distylium (olive-like foliage)
- Terracotta pots → Herbs (basil, thyme, oregano, sage, rosemary)
- Stone-look DIY planters → Larger statement plants
Step 6: Style and Arrange
This is where your patio becomes a cohesive, inviting space.
Action:
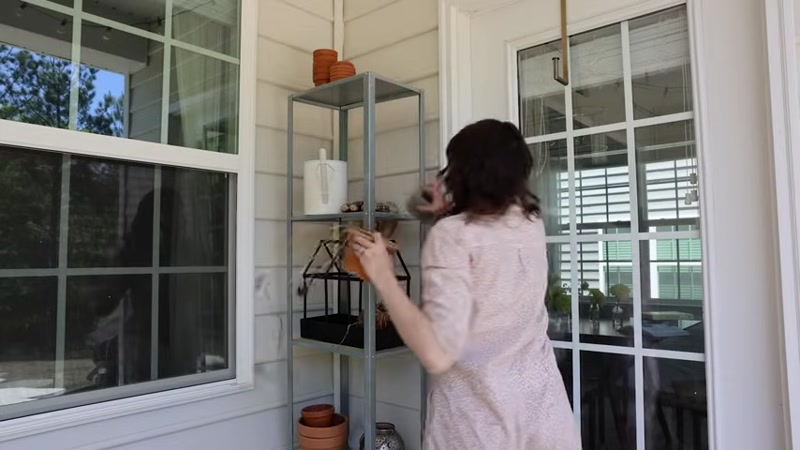
- Create your herb garden on shelves, using all tiers for maximum greenery.
- Layer in decor items like gardening gloves, small pots, and your metal greenhouse.
- Scatter remaining plants around the patio, balancing heights, colors, and textures.
- Add new doormat, solar lanterns, and refreshed throw pillows.
- Swap out old pillow covers instead of buying new pillows—much more affordable.
- Move plants around until you're happy with the arrangement. Don't be afraid to experiment!
Step 7: Add Final Touches

Complete your transformation with these finishing details.
Action:
- Hang the flower basket on your door instead of a traditional wreath
- Place camping chairs nearby for extra seating when entertaining
- Step back and enjoy your transformed space
Tips for Success
- Invest in good tools first. A quality mop, sturdy gloves, and reliable spray paint will make your DIY projects much easier and give better results.
- Work in stages. This project can easily take a full day or weekend. Break it into manageable chunks—clean one day, pot plants the next, style on day three. Your back will thank you.
- Mix perennials and annuals. Perennials come back year after year (saving you money), while annuals provide instant, vibrant color. A 50/50 mix gives you the best of both worlds.
- Don't be afraid to repurpose. Old pillow covers can be replaced with new ones instead of buying entire new pillows. Plastic planters can be transformed with stucco and paint. A little creativity goes a long way.
- Let plants guide your design. Consider each plant's light requirements, growth habits, and mature size when placing them. A plant that needs full sun won't thrive in a shady corner, no matter how pretty it looks there.