What You'll Need
I found this little terracotta pot at a home improvement store, but you can probably find them at craft stores too. The whole thing is about relaxing and making something you like — no pressure.
- Small terracotta flower pot
- Matte black chalkboard spray paint (for the base coat)
- DecoArt Americana Gloss Enamel paints (multi-surface acrylic that can be baked on to become permanent)
- Dotting tools (I used the double-ended 5-piece oval set from Dot Art Depot)
- Cotton swabs (for fixing mistakes)
- Spray gloss varnish
Colors I used: lavender, bright orange, Calypso blue, true blue, festive green, vivid violet, true red, bright yellow, and white. Use whatever colors make you happy.
Step-by-Step
1. Base coat
Spray the pot with matte black chalkboard paint. It's fine if a little gets inside — just try to keep it mostly on the outside.
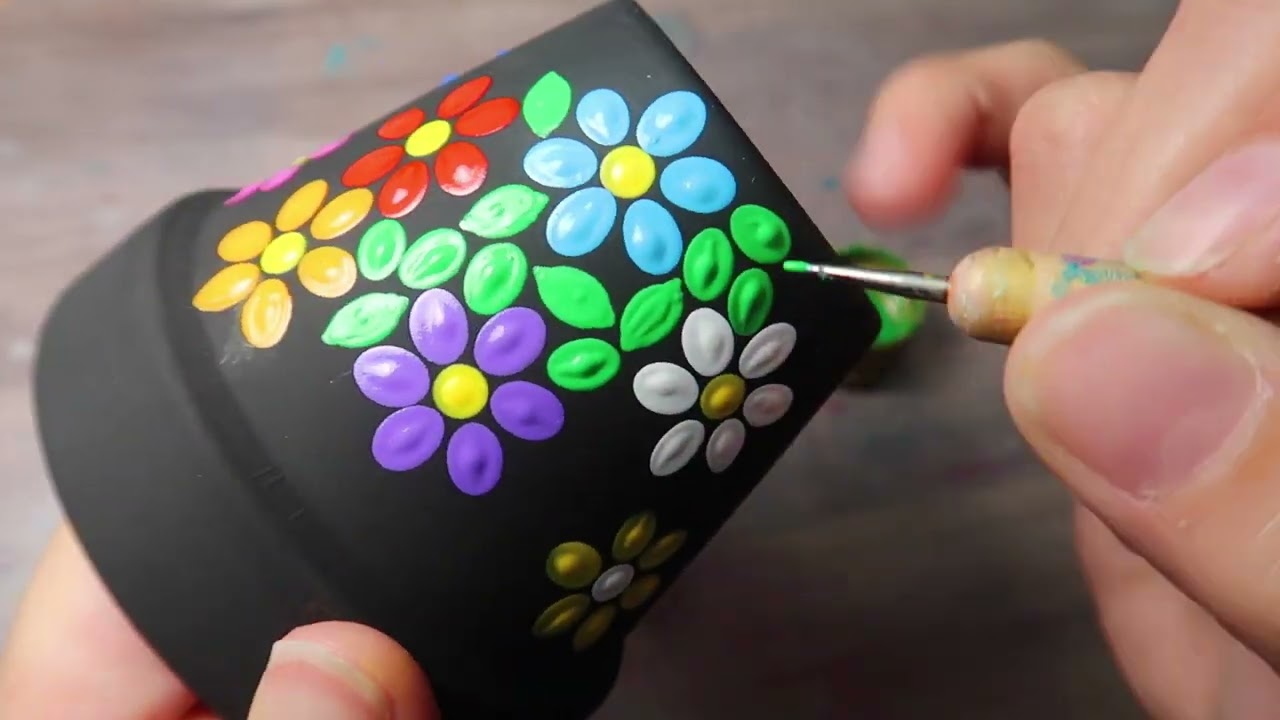
2. Plan your dots
Use white or yellow for the flower centers. Keep them about an inch apart so the petals have room. If they end up too close, it's not a big deal — you'll see how to handle that later.
I used a pink acrylic rod from McDonald's to make the center dots (yes, really). Stick a piece of kneaded eraser on the bottom of the pot to keep it from rolling around.
3. Make the petals
Take your oval dotting tool (I used size 3 for most flowers). Place an oval anywhere around a center dot, then place another one directly across from it. Fill in the gaps on each side so you end up with six petals total per flower.
You can alternate colors, use all the same color, or layer smaller ovals on top of dried ones for a gradient effect. It's your project.
4. Fix mistakes
If you mess up, grab a damp cotton swab and twirl the paint away. Let it dry, then re-dot. Nobody will notice anything you think looks wrong — we're always our own worst critics.
5. Add leaves
Fill in the spaces between flowers with green leaves. I crowded mine in pretty tight because I like a full look, but leave negative space if that's your thing. Use a size 1 dotting tool for the tiny gaps.
6. Detail the leaves
Take a small nail stylus (size 1) and dot some of the leaf edges — not all of them, just enough to give it a nice look.
7. Work in sections
Break the pot into thirds. Paint one third, let it dry (acrylic dries fast — maybe 20 minutes depending on your climate), then rotate and do the next third. Keep your hand inside the pot to rotate it when possible.
8. Add rim detail
I used Q-tips to put rainbow colors across the top rim of the pot.
9. Varnish
Make sure the paint is completely dry, then spray with gloss varnish. Do this outside — don't spray that stuff in your house.
That's it. Make it your own, have fun, and don't stress about perfection.


