Keeping chickens looks simple at first. Give them a place to sleep, a waterer, a feeder, some bedding, and you are done. But anyone who has raised chickens for more than a year knows that the standard setup comes with a long list of daily frustrations. Waterers get knocked over. Feeders fill up with bedding. Winter ventilation turns into a cold draft. Summer smells attract flies. Going away for a weekend means finding someone to open and close the coop door twice a day.
So what does an efficient chicken coop actually look like? This article walks through a set of non-traditional design choices that have been tested in real use. Some of these ideas go against common advice, but they have proven themselves to be practical, low-maintenance, and genuinely easier for both the chickens and the keeper. Whether you are planning a new coop or looking to improve an existing one, these design concepts might save you years of frustration.
Modular Construction: Building for the Next Move
A well-built chicken coop is not cheap. Lumber, hardware cloth, roofing materials, and quality fasteners add up quickly. If you have to leave the coop behind every time you move properties, you are essentially rebuilding your investment from scratch. That is where modular design makes sense.
In this approach, the entire coop breaks down into six separate sections: the roof, four walls, and the floor panel. Each section connects to the next using bolts or removable metal brackets. When moving day comes, two people can fully disassemble the coop in about half an hour, load everything onto a trailer, and reassemble it at the new location over a weekend.
Modular construction offers another benefit beyond portability. Repairs become much simpler. If one wall starts to rot after several years of rain and snow, you can unbolt that section alone, build a replacement, and attach it without touching the rest of the structure. No need to tear down the whole coop or work around failing lumber.
Exterior Finishes: Balancing Looks with Practicality
White paint with black trim has become a popular choice for modern chicken coops, and for good reason. White reflects sunlight, which helps keep the interior cooler during summer. It also makes dirt and buildup immediately visible. That may sound like a disadvantage, but seeing the mess means you clean it sooner. Dark-colored coops hide grime, so problems can go unnoticed for weeks, allowing bacteria and odors to build up.
Black trim around windows, doors, and roof edges adds visual definition. It creates a crisp farmhouse look without requiring constant touch-ups. The dark color also hides minor scuffs and scratches that happen during daily use. More importantly, black edges visually shrink the perceived size of the coop, making it feel more intentional and less like a purely utilitarian structure.
Ventilation: Keeping Cold Air Away from the Birds
Ventilation is the single most misunderstood part of chicken coop design. Many people cut a hole in the wall, install a louvered vent, and call it done. That approach creates a direct draft across the chickens, which is exactly what you do not want, especially in winter. Cold air blowing directly on roosting birds forces them to burn extra calories just to stay warm. Egg production drops, feed bills rise, and respiratory issues become common.
The better way is to place all ventilation at the highest point of the coop, just under the roof line. Warm, moist air naturally rises. As it reaches the peak, it escapes through a continuous gap between the roof and the wall. Fresh air enters from lower points, but by the time it reaches the height where chickens roost, it has already mixed with the warm air inside and lost its chilling effect.
In a well-designed coop, the roosts sit at least twelve inches below the lowest ventilation opening. That gap ensures that even on a windy winter night, the moving air passes above the chickens, not through them. Moisture from respiration and droppings escapes out the top, preventing condensation from forming on the walls and ceiling. Dry air is warm air. Wet air feels cold even at the same temperature.
Roosts: Height, Spacing, and Social Order
Chickens instinctively want to sleep as high as possible. The highest bird in the pecking order claims the highest spot on the roost. That natural behavior works well as long as the top roost stays below the ventilation line. If the highest roost sits too close to the ceiling, chickens end up sleeping directly in the path of cold air movement.
A good rule of thumb is to set the highest roost about two feet off the ground. That leaves plenty of room above for ventilation while still giving chickens the elevation they prefer. A second, lower roost can be added for the rest of the flock. Just make sure the two roosts are not stacked directly above each other. When roosts are in a vertical line, the birds on top drop droppings directly onto the birds below. Place them side by side instead, with the higher one further from the wall and the lower one closer in.
As for space, chickens crowd together when they sleep. You only need about eight to ten inches of roost length per bird. More room than that actually encourages them to spread out, which reduces shared body heat in cold weather. So do not overbuild the roosting area. A single eight-foot roost comfortably handles eight to ten standard-sized hens.
Automatic Doors: Why They Are Worth It
An automatic chicken door might seem like an unnecessary luxury, but once you install one, you wonder how you ever managed without it. The most obvious benefit is not having to wake up early to let the chickens out or rush home before dark to lock them in. That freedom alone is valuable.
But the deeper value comes from security and consistency. Chickens follow the sun. They want to leave the coop at dawn and return at dusk. If you open the door late, they pace and stress at the entrance. If you close it early, a hen might get locked out for the night, becoming an easy target for predators. An automatic door opens and closes at the exact same time every day, and you can adjust the schedule as the seasons change.
Predators are smart. They learn routines. A raccoon or fox will watch a property for several nights. If it notices that no one comes to close the coop until ten o'clock, it will strike at nine-thirty. A self-locking automatic door removes that vulnerability. Even if a predator pushes or pries at the door, the locking mechanism holds it shut.
When installing an automatic door, pay attention to a few details. Keep the track clean of bedding debris and mud. Check batteries monthly. If the door uses a solar panel, position it where it gets direct sun for most of the day. Test the light sensor or timer settings after any power interruption. A door that fails to open at dawn is as bad as no door at all.
Waterer Placement: The Case for a Separate Water Box
Most coops hang the waterer in the middle of the floor or tuck it into a corner. Both locations cause problems. Chickens bump into hanging waterers as they move around, sloshing water onto the bedding. They scratch bedding material with their feet, kicking wood shavings, straw, and droppings directly into the drinking water. That dirty water grows bacteria, and chickens refuse to drink enough when the water tastes bad, leading to dehydration and reduced egg production.
Worse, spilled water in winter turns into ice. A wet floor freezes into a slippery, uneven surface. Chickens can slip and injure themselves, and the ice locks bedding into a solid, unsanitary mat. Excess moisture also raises the humidity inside the coop, which makes the air feel colder and promotes frostbite on combs and wattles.
A simple but effective solution is to build a separate water box inside the coop. This is a small, partitioned area with a low barrier that chickens can reach over or through, but that prevents them from walking fully into the waterer space. The waterer sits inside this box, safe from being bumped or scratched into.
The barrier only needs to be about twelve to fifteen inches high with an opening wide enough for a chicken to stick its head through (about six to eight inches). The waterer sits on a small platform or directly on the floor of the box. If you use a heated waterer in winter, the power cord runs out through a small notch in the barrier, well out of reach of curious beaks and feet.
This water box keeps the main floor of the coop completely dry. Spills are contained. Bedding stays where it belongs. And you refill the waterer less often because it is not constantly being contaminated.
Feeder Placement: Moving It Outside
The same logic applies to feeding, but with an even more efficient solution. Instead of putting the feeder inside the coop at all, mount it on the exterior wall. Cut an opening in the wall and install a funnel or chute that feeds into a shallow tray on the inside. You pour feed into the outside hopper, and gravity carries it into the coop.
This design frees up floor space inside the coop. That extra room matters most during winter when chickens might stay indoors for days at a time due to snow or extreme cold. More floor space means less crowding, less pecking, and fewer stress-related behavior problems.
An exterior feeder also keeps feed dry. The storage hopper sits under a roof overhang or inside a weatherproof housing. Rain and snow cannot reach the feed. And because you never have to open the coop door to add feed, there is no chance of chickens escaping while you refill.
If an exterior feeder is not possible right away, at least place the feeder near the door rather than in the center of the floor. Every bit of open space matters, especially in smaller coops.
Nest Boxes: Save Space by Going Outside
Nest boxes take up valuable floor space, but they do not have to. By building the nest boxes to protrude outside the coop wall, you keep the interior open while still providing comfortable laying spots. The box attaches to the outside of the wall, with an opening on the interior side for the hens to enter. The roof of the box slopes away from the coop for rain runoff, and a hinged lid on the outside gives you access to collect eggs without stepping inside.
Keep the nest box floor about six to eight inches above the coop floor. Hens prefer to jump up slightly to reach a nest. That slight elevation also prevents bedding from being kicked out of the box as easily.
How many nest boxes do you need? Fewer than you think. A flock of eight to ten hens will happily use two boxes. They all want the same one anyway. Offering more boxes does not spread them out; it just gives you more to clean. Focus on making those two boxes feel safe, dark, and quiet. Position them away from the busiest path through the coop.
Raised Coops: Using the Space Below
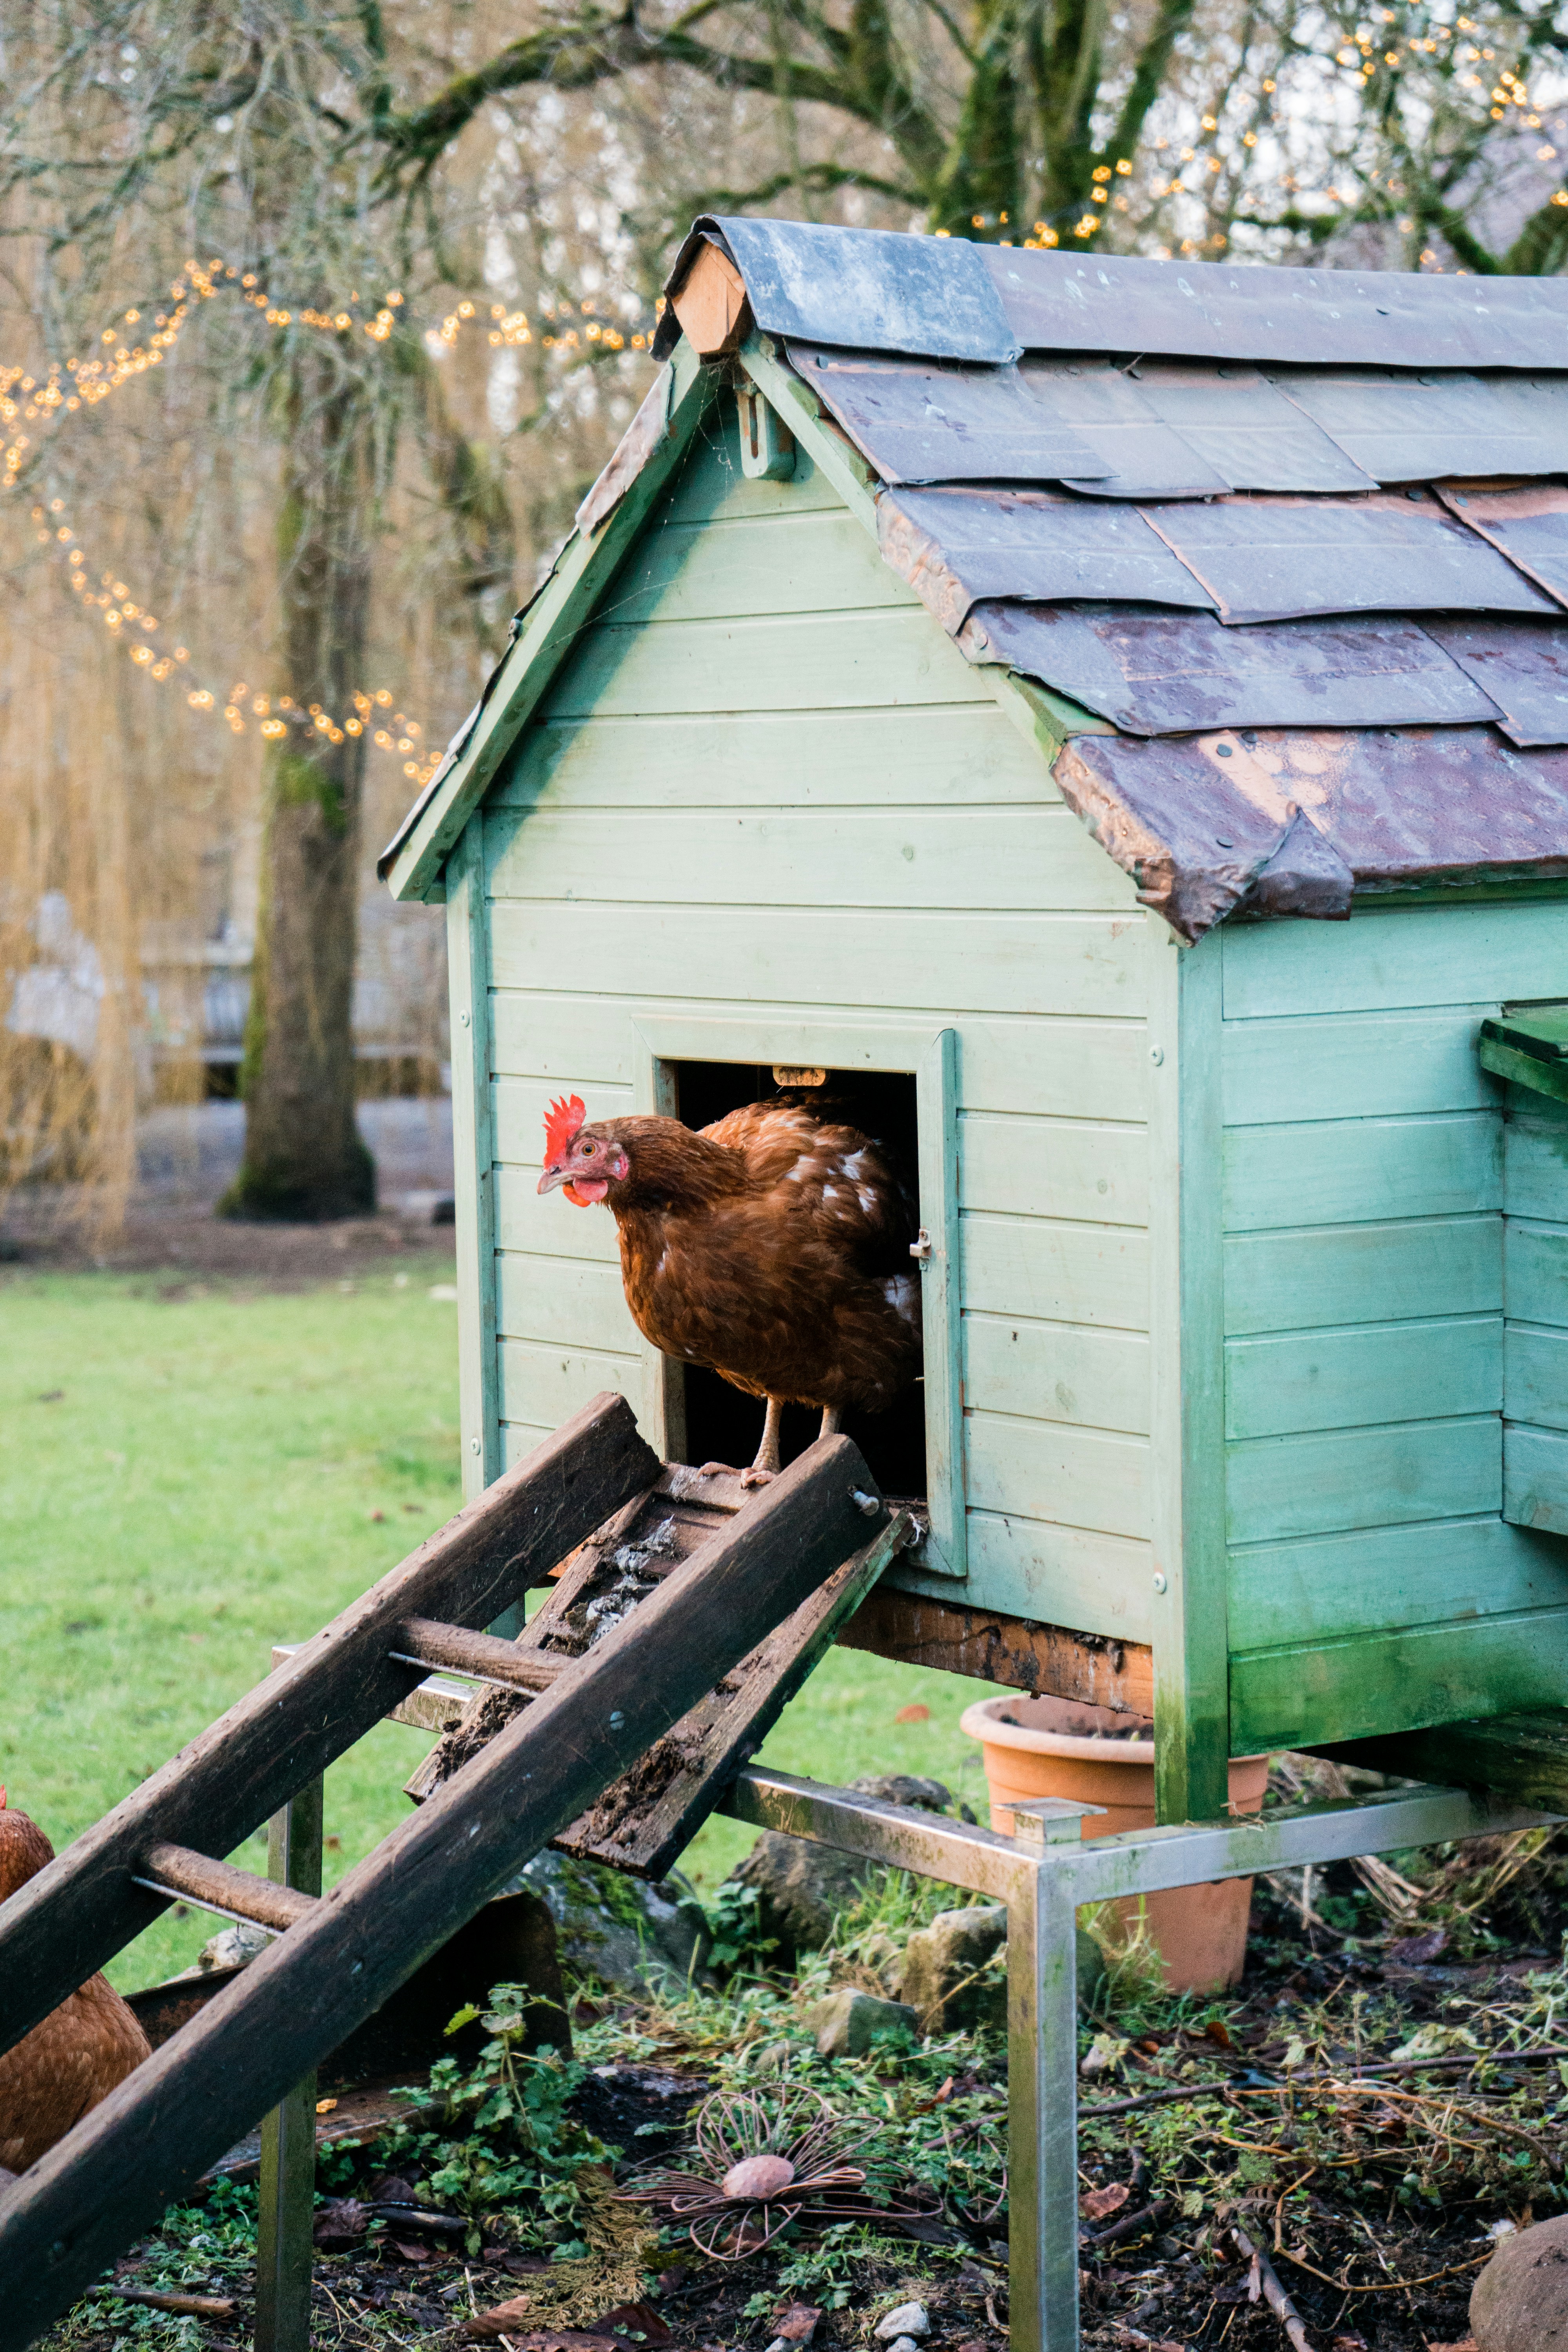
Should a chicken sit directly on the ground or be elevated? Both designs have merit, but a raised coop offers several unique advantages. The space underneath becomes a sheltered area where chickens can escape rain, hot sun, and aerial predators. In summer, that shaded area stays significantly cooler than the open run. Chickens will spend hours dust bathing in the dry soil under a raised coop.
There is a common concern about cleaning underneath a raised coop. In practice, it almost never needs cleaning. Rain washes away most of the droppings. The sun dries the ground and kills bacteria. Chickens themselves eat insects and scratch through the surface, breaking down any organic matter. In three years of use, this type of raised coop never developed a smell or required active cleaning underneath.
If you choose a raised design, you need a ramp or a set of shallow steps for the chickens to get in and out. The ramp should have cleats or small crosspieces so chickens do not slip, especially in wet or icy weather. You also need to enclose the underside with hardware cloth to prevent predators from digging under and coming up through the floor. But that is a one-time installation that lasts for years.
Calcium Supplementation: An Alternative to Oyster Shell
The traditional way to provide calcium for laying hens is to offer a dish of crushed oyster shell. Hens are supposed to eat it as needed. But many chicken keepers notice that the oyster shell sits untouched for weeks. The hens are not eating it, not because they do not need calcium, but because they do not like the texture or taste.
Black soldier fly larvae offer a better alternative. Dried larvae contain significantly more calcium than mealworms, and chickens instinctively hunt for and eat insects. Offering dried larvae as a daily treat provides both calcium and protein. Unlike oyster shell, there is no waste. The chickens clean up every piece.
Using larvae as a calcium source works especially well in winter when chickens cannot free-range for insects. The larvae also serve as a training tool. If you need to move chickens into a new coop or call them back to the run, scattering a handful of larvae gets their attention immediately. They learn to associate you with the treat, which makes handling and moving them much easier.
The only downside is cost. Dried larvae cost more than oyster shell per pound. But because nothing gets wasted, the effective cost may be closer than it first appears. If budget allows, this is a worthwhile upgrade to chicken health and ease of management.
The Run: What to Keep in Mind
The outdoor run attached to the coop has not been built yet in this particular setup, but a few design principles are already clear. The run needs a fully covered top to protect against hawks and owls. Hardware cloth works better than chicken wire for the top as well as the sides. Predators can bite through chicken wire.
The floor of the run benefits from a layer of coarse sand or fine gravel. Sand drains quickly, does not pack into mud, and makes cleaning droppings easy with a cat litter scoop. If the run stays in one place for years, plan to turn the soil or replace the sand annually to prevent parasite buildup.
A buried perimeter apron of hardware cloth stops digging predators. Dig a shallow trench about six inches deep and six inches wide around the outside of the run. Lay the mesh so it extends outward horizontally from the wall, then cover it with soil. Any animal that digs down hits the mesh and cannot get past it.
Provide at least half of the run with a solid roof or heavy shade cloth. Chickens need to choose between sun and shade throughout the day. Overheating kills chickens faster than cold does, and shade is essential in summer.
Putting It All Together
No single coop design works perfectly for every property, every climate, or every flock. But the ideas in this article address the most common frustrations that chicken keepers face: spilled water, dirty feed, cold drafts, wasted floor space, vulnerable nights, and the hassle of daily door duty.
A modular coop survives multiple moves. A well-ventilated coop with high outlets keeps birds dry and warm. A separate water box stops spills and contamination. An exterior feeder opens floor space. Automatic doors provide security and consistency. Raised designs add sheltered outdoor space. And black soldier fly larvae offer a calcium source that chickens actually want to eat.
None of these ideas is traditional. Some of them go directly against advice you will find in old poultry books. But they have been tested in real conditions, and they work. If even one of these concepts helps you spend less time fighting your coop and more time enjoying your flock, then this article has done its job.