What You'll Need
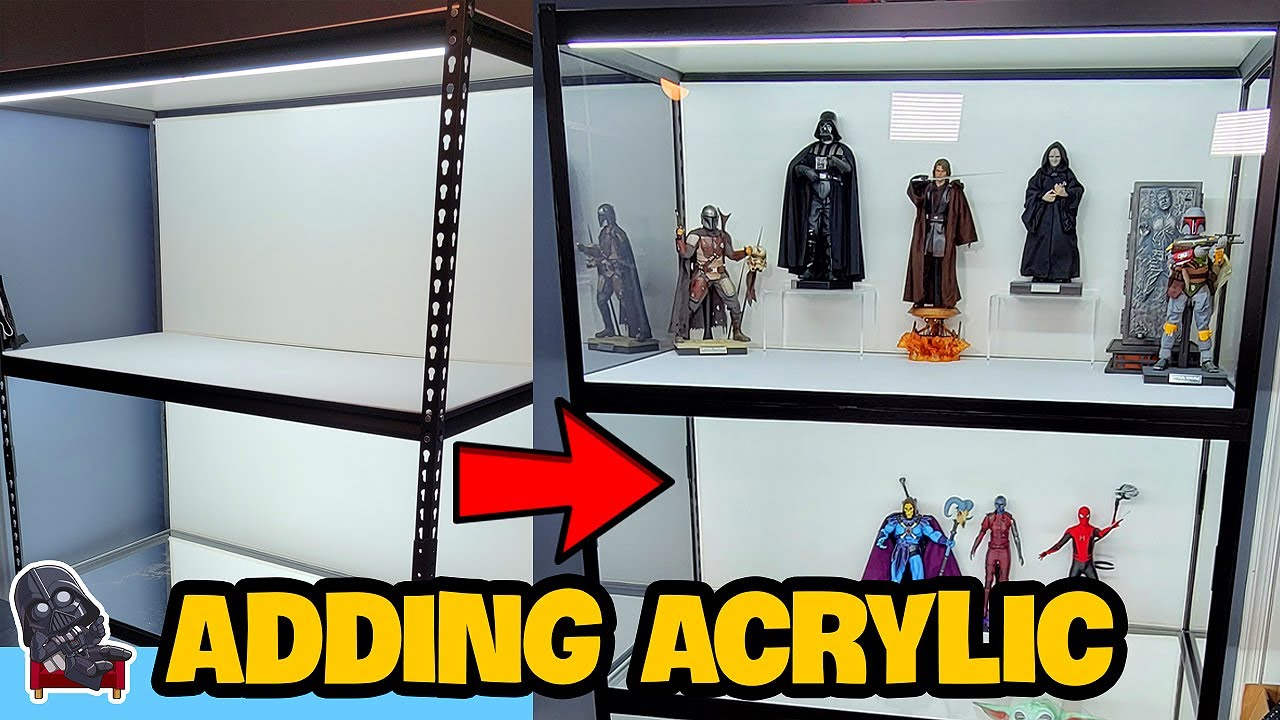
I hate dusting my collectibles. And my shelves. And basically everything else in my house. Plus I have pets, so fur gets absolutely everywhere. So when I built a garage shelf display for my figures, I knew I had to seal it up with acrylic panels.
Here's how I did it, including all the mistakes and tips I picked up along the way.
- 48" x 72" x 3/32" acrylic sheet (for front panels)
- Two 24" x 72" x 1/16" acrylic sheets (for side panels)
- 1/2" wide x 1/4" thick open cell foam adhesive strips (13 feet)
- Magnetic tape (1/2" wide)
- 2" black vinyl tape
- Razor knife
- Clamps
- Straight edge
- Dry erase marker
- Pliers (for fixing jagged cuts)
Step 1: Buy Your Acrylic Smart
Acrylic got crazy expensive during COVID, and it's still not cheap. I originally wanted everything pre-cut to size, but that added a ton to the cost. So I ordered large sheets and cut them myself.
The cheapest way to buy acrylic? Get sheets in sizes divisible by 12. I ended up with 48x72 and 24x72 inch sheets.
For the side panels, I went with 1/16" thickness since I don't plan on removing them once installed. The front panels are 3/32" — a bit thicker so they stay rigid when I take them on and off.
Buy local if you can. You'll avoid insane shipping costs, and local shops often have sizes Home Depot doesn't carry, usually for a better price.
Tip: Keep the protective plastic covering on the acrylic until you're ready to install it. This saves the surface while you're cutting and taping.
Step 2: Cut the Front Panels
I cut the big 48x72 sheet into three separate panels. This way I can remove just one section at a time instead of wrestling with one giant panel.
Measure each opening on your shelf:
- Top panel: From top of top shelf to middle of second shelf = 25.5" high
- Middle panel: From middle of second shelf to middle of third shelf = 24.5" high
- Bottom panel: From middle of third shelf to bottom of bottom shelf = 21.25" high
Cutting method:
Lay the panel flat, measure your height, make a couple marks, and draw a line with your straight edge. Clamp it to a table with the straight edge aligned.
Take your razor knife and score the line. I scored mine 10-15 times. Then flip the panel over and score the other side too.
Apply even pressure and the piece should snap clean off. It doesn't need to be perfect — the edges get covered with vinyl tape anyway.
Tip: Be patient with scoring. If you don't score enough, you'll get jagged edges. You can clean those up with pliers, but if you're a perfectionist, score more than you think you need. Or buy scrap acrylic to practice on first.
Step 3: Cut the Side Panels
The side panels stay as one piece each, but I needed to cut them down from 72" to 71 3/16" to fit my shelf. Same scoring and snapping method as the front panels.
Step 4: Add the Black Vinyl Border
This is where the panels start looking professional. The black vinyl tape hides the edges, stops light from bleeding through, and gives everything a clean, finished look.
Peel back the protective plastic a few inches around the border on both sides of the panel.
Border widths:
- Most sides: 1" wide
- Top of top front panel, bottom of bottom front panel, tops and bottoms of side panels: 1.5" wide
Measure 1" in from the edge and mark with a dry erase marker (wipes right off when you're done). Draw a line with your straight edge as a guide.
Taping order: Sides first, then top and bottom. I just like how consistent it looks.
Pull a long piece of tape and lay it down following your line. Leave about an inch overhang so you can fold it over the edge. Press down as you go, working out air bubbles.
When you get to the end, cut the tape so you can fold the overhang over the edge. Make a second cut to help fold the long edge cleanly.
Tip: You'll get better at this with practice. I noticed each panel came out smoother than the last. If you mess up, peel it off and try again.
Step 5: Make It Dust-Proof
This was the whole point for me. I used open cell foam adhesive strips along the edges of every panel.
Cut the 1/2" thick foam strips in half lengthwise — now you have two 1/4" strips. Measure each side of the panel and cut the foam to match.
Peel the adhesive backing and stick the foam to the edge of the panel. Make sure the straight factory edge is on the outside — it looks cleaner and lines up better.
Easier method I discovered mid-project: Before cutting the foam strip in half, measure the length you need for one side. Cut the strip in half, and now you have two pieces the exact same length for two sides of your panel. Saves measuring twice.
Step 6: Add the Magnets
I went with magnetic tape instead of velcro because it creates a lower profile and the panels are easier to remove. The magnetic tape is 1/16" thick, but doubling it up to 1/8" works best with the quarter-inch foam.
To save money: Buy 1" wide magnetic tape and cut it in half. Worked great for me.
You don't need magnets all the way around each panel — just enough to hold it securely against the metal shelf. Skip areas with rivets or raised sections where shelf posts connect.
I started at the top of the top shelf and measured down to map out where to place the magnetic tape. I put it between rivets that were far apart, but skipped spots where rivets were close together.
Tip: Let the magnetic tape sit for a few hours after sticking it to the acrylic before attaching the panels to the shelf. This lets the adhesive set. Most of mine stuck great, but a couple pieces needed some adjustment.
Step 7: Install the Panels
Peel off the protective paper, clean the inside of the acrylic, and put the panels on the shelf. Clean the outside once they're in place.
Final Thoughts
Is it perfect? No. But I made it with my own two hands, and I can forgive a few imperfections. If I'd paid for a custom shelf and it wasn't perfect, I'd care a lot more.
This project wasn't just about saving money. Building things helps me get out of my head and deal with depression and anxiety. Creating something with your hands — even if it's not flawless — feels good.