Easy Build Planter Boxes: A Beginner's Guide to Beautiful Outdoor Planters
Here is the DIY tutorial article based on the video transcript you provided.
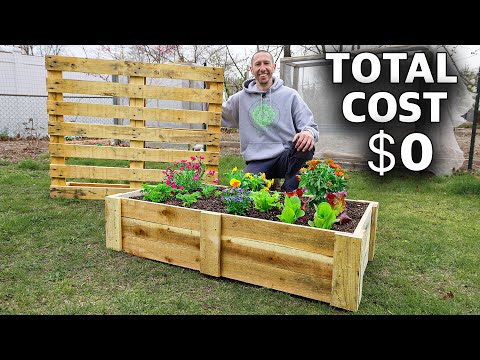
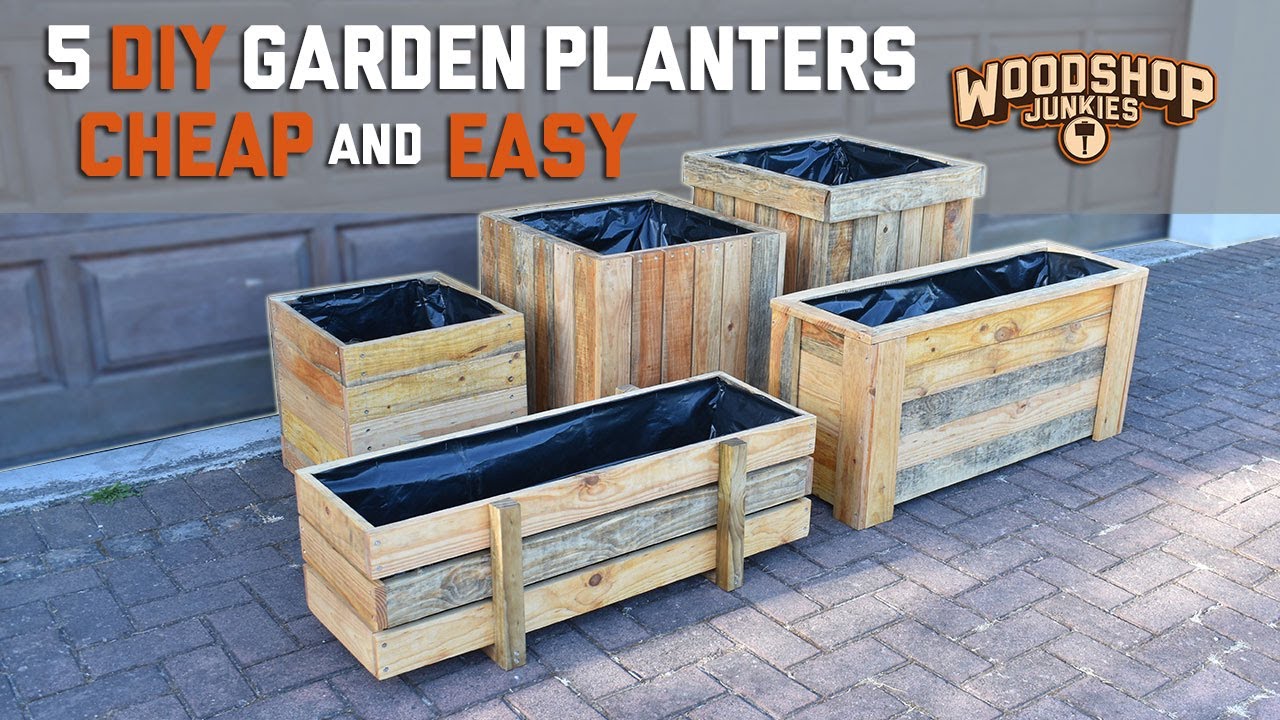
This guide will show you how to build several stylish and durable planter boxes using simple techniques that don't require a massive workshop. We'll focus on assembly methods that allow you to create custom-sized planters quickly, making this a perfect weekend project for any DIY enthusiast. Whether you prefer vertical or horizontal slats, these designs are easy to scale and adapt to your space.
What You'll Need
Materials:
- Rough-cut lumber (like pallet wood) or a weather-resistant species (like cedar or redwood)
- Exterior-grade wood glue
- Exterior-grade screws (e.g., deck screws)
- Plastic sheeting or pond liner (for lining the inside)
- Sandpaper (medium grit)
Tools:
- Miter saw (or hand saw with a simple jig)
- Drill / Driver
- Measuring tape
- Clamps
- Sander (optional, but helpful)
- A simple drill jig (a scrap piece of wood with pre-drilled holes to speed up assembly)
Step-by-Step Guide
#### Step 1: Prepare Your Components
This project is built from repeating parts, so the key is to set up for fast, repeatable cuts.
- Set a Cut Stop: On your miter saw, clamp a block of wood at the desired length for your planter's base, top frame, and slats. This allows you to cut multiple pieces to the exact same size without measuring each one.
- Create a Drill Jig: Use a scrap piece of wood to create a drilling guide. Drill a few pilot holes in the scrap at the correct spacing for your screws. When you need to drill a screw hole, clamp this jig onto your work piece. This ensures all your screw holes are perfectly aligned, every time.
#### Step 2: Assemble the First Planter (Base & Vertical Slats)
This is the simplest design, consisting of a base, an upper frame, and vertical slats.
- Build the Base Frame: Take your pre-cut pieces for the base and upper frame. Assemble them using wood glue and screws. The base frame should have gaps between the planks to allow for drainage.
- Attach the Vertical Slats:
- Apply a bead of glue to the edge of a slat.
- Place it onto the base frame. Use a small spacer (like a coin or a piece of cardboard) to create a consistent gap between each slat. This helps hide any slight height differences in the rough-cut lumber and improves drainage.
- Secure the slat with screws from the inside of the frame.
- Repeat: Continue adding slats until you've covered the entire perimeter.
#### Step 3: Assemble the Second Planter (Panel Assembly)
This method creates a cleaner look with fewer visible screws and allows you to install the base at any height.
- Build Side Panels: Assemble four individual panels. Each panel is made by attaching vertical slats to two horizontal rails (top and bottom).
- Join the Panels: Place two side panels at a 90-degree angle. Drive screws through the edge of one panel into the side of the other. Repeat to form a box.
- Install the Base: Once the box is assembled, you can install the base at any height. This is a great way to save on soil and water for taller planters. Simply cut a piece of wood to fit inside the box and screw it into the side panels.
#### Step 4: Build the Third Planter (Horizontal Slats)
This design uses a U-shaped support frame to attach horizontal slats.
- Build U-Shaped Frames: Cut and assemble two identical U-shaped frames. These will be the end supports for your planter.
- Attach Horizontal Slats: Start at the bottom. Apply glue to the end of a horizontal slat and screw it into the side of one U-frame. Use a level to ensure it's straight, then screw the other end into the second U-frame. Continue adding slats, using a spacer for even gaps, until you reach the top.
#### Step 5: Assemble the Fourth Planter (U-Bracket Variation)
This is a variation on the previous design, where the U-shaped bracket is on the outside.
- Build Panels: Assemble horizontal slats into flat panels.
- Create the Outer U-Bracket: Build a U-shaped frame that will sit on the outside of your planter box.
- Attach Panels to the Bracket: Screw your pre-built panels directly to the inside of the outer U-shaped bracket.
#### Step 6: Assemble the Fifth Planter (Closed Horizontal Slats)
This final planter is similar to the second one but uses horizontal slats with no gaps.
- Build Side Panels: Assemble four panels, this time attaching horizontal slats with no gaps. Because there are no gaps, you must carefully sand down any height deviations between the slats for a flush, professional look.
- Join the Panels: Screw the four panels together to form the planter box.
#### Step 7: Add a Finishing Trim (Optional)
To give any of your planter boxes a more polished look, add a trim piece around the top edge. This caps off the ends of the slats and creates a clean, finished appearance.
#### Step 8: Line and Finish
- Sand: Lightly sand the outside of your planter to smooth any rough spots, but be careful not to remove the character of the rough-cut lumber.
- Line with Plastic: Cut a piece of plastic sheeting large enough to line the inside of the planter box. This will protect the wood from wet soil.
- Pierce for Drainage: Poke a few small holes in the plastic at the bottom of the planter to allow excess water to drain out.
Tips for Success
- Use a Drill Jig: This is the single most important tip for a fast and accurate build. It eliminates the need to measure and mark every single screw hole.
- Spacing is Key: When using rough-cut lumber, always use a small spacer between slats. This makes any slight variations in plank height much less noticeable and gives the planter a more professional look.
- Scale and Adapt: The beauty of these designs is that they are modular. By changing the length of the base, frame, or slats, you can easily build a planter of any size to fit your specific space.
- Glue for Strength: While screws provide the primary hold, adding exterior-grade wood glue to every joint will significantly increase the planter's long-term strength and durability.
- Choose the Right Wood: For outdoor use, always choose a rot-resistant wood like cedar, redwood, or pressure-treated lumber. Using pallet wood is a great budget option, but it may not last as long.
FAQ
Q: Can I build these planters without a miter saw?
A: Absolutely. You can use a hand saw and a simple jig (a guide block clamped to your wood) to make straight, repeatable cuts. The same principles of setting up for repeatability apply.
Q: Do I have to line the planter with plastic?
A: Yes, it is highly recommended. Lining the inside protects the wood from constant moisture, which will cause it to rot much faster. It also helps keep the soil from falling out through the gaps.
Q: How do I make the planter taller or wider?
A: The designs are very adaptable. To make a planter taller, simply use longer vertical slats. To make it wider, cut the base, frame, and slat components to a longer length. All the assembly techniques remain the same.
Q: Can I paint or stain the planter?
A: Yes, you can apply an exterior-grade paint, stain, or sealant after the planter is built. Just make sure the wood is clean and dry before applying. If you use pressure-treated lumber, wait a few weeks for it to dry out before finishing.