How to Build a Custom Walk-In Closet with a Hidden Tech Island
Here is a DIY tutorial article based on the provided transcript.
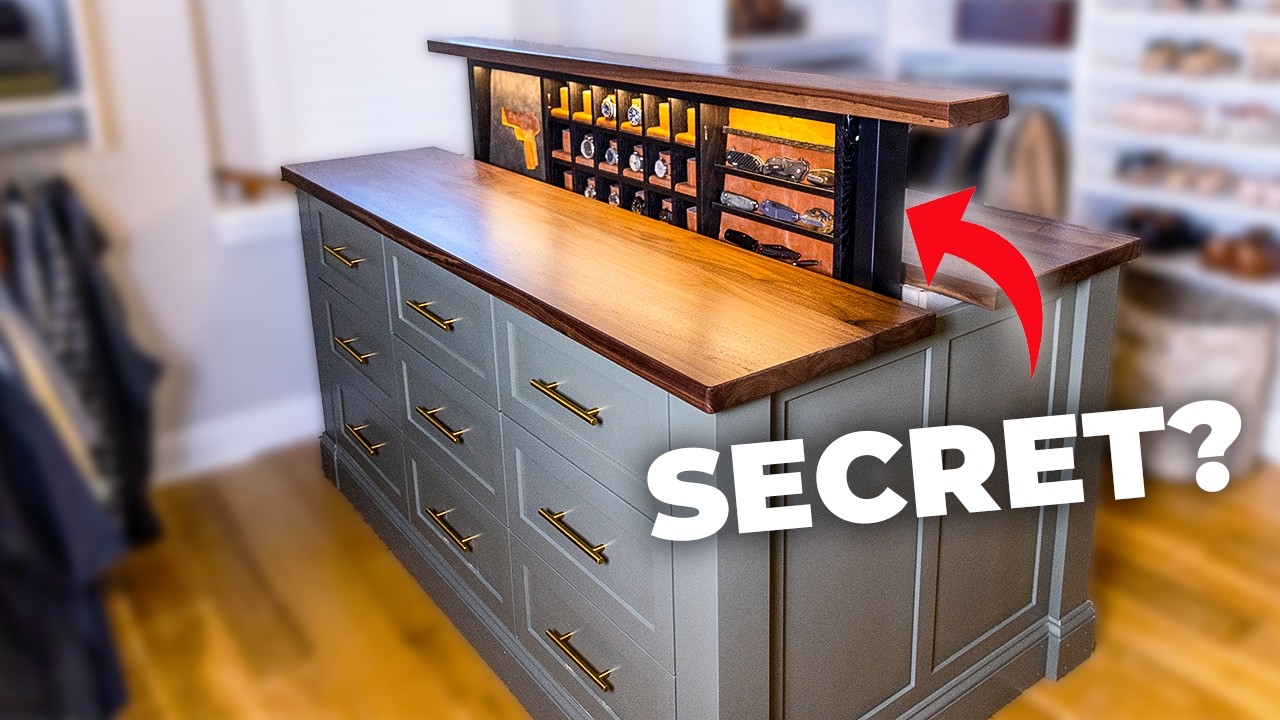
This guide will walk you through transforming a cluttered, wire-rack closet into a beautiful, functional space featuring a custom island with a secret, rising center console. This project is designed for intermediate DIYers and is broken down into manageable steps.
What You'll Need
Materials:
- Modular closet system (cabinets, drawers, shelves, hanging rods)
- Pre-finished plywood (for island carcass and drawer boxes)
- Solid walnut lumber (for island countertop and watch holders)
- Maple lumber (for drawer fronts)
- 1/2" plywood or MDF (for island panels and trim)
- Wood glue
- Pocket hole screws (1-1/4" and 2-1/2")
- Drawer slides (Blum undermount)
- Sit-stand desk lift mechanism (two columns, no connecting rod)
- LED light strips with diffusers
- Leather (for lining watch compartments)
- Foam (for padding)
- Strong magnets (for watch holders)
- Paint (dark green, black) and primer
- Lacquer or clear coat (for walnut)
- Edge banding (for plywood)
- Wood filler
- Sandpaper (80, 120, 220 grit)
- Zip ties
- Electrical wire and connectors
Tools:
- Table saw
- Miter saw
- Router with bits (including a slot-cutting bit)
- Drill and drill bits
- Impact driver
- Brad nailer
- Clamps
- Level
- Tape measure
- Square
- Sander (orbital or wide belt)
- Welder (optional, for custom brackets)
- Paint sprayer (recommended for speed)
Step-by-Step Guide
#### ## 1. Demolition and Preparation
This step is messy but crucial. Start by removing all existing wire racking, rods, and shelving. Be prepared for drywall damage from the old hardware.
- Remove the racking: Unscrew and pull out all wire shelves and supports. This will likely leave holes and tears in the drywall.
- Patch the walls: Use joint compound (mud) to fill all holes and imperfections. Let it dry completely.
- Address the floor: Carefully remove the quarter-round molding to see if the floor was installed before or after the closet. In this case, the floor was on top, so the molding was simply replaced later.
- Fix electrical hazards: If you find any unsafe electrical work (like an uncovered outlet behind a panel), remove it and properly cap or relocate the wiring.
- Paint: Once the walls are dry and sanded, apply a coat of primer and two coats of your chosen paint color. A dark, moody green was used here.
#### ## 2. Install the Modular Closet System
With the room prepped, it's time to install the new storage system.
- Plan the layout: Use the design tools provided by the modular closet company to plan your layout. Pre-assemble all cabinets before bringing them into the room.
- Hang the cabinets: Locate the wall studs. Use the provided cleat system to hang the upper cabinets. Ensure the first cabinet is perfectly plumb and level, as all subsequent units will align with it.
- Make adjustments: Be prepared to make minor modifications. In this build, the cleats were slightly too tall for a specific gap, requiring a quick solution to shim or adjust the hanging brackets.
- Complete the installation: Continue hanging all upper cabinets, base cabinets, drawers, and shelves according to your plan. This system is designed for a fast DIY install, saving you time for the custom island.
#### ## 3. Build the Custom Island Carcass
The island is built from simple plywood boxes. The key is speed and simplicity.
- Cut the parts: Rip and cut your pre-finished plywood into the following parts per box: two sides, one top, one bottom, and two back stretchers.
- Assemble the boxes: Use wood glue and exterior-grade screws to assemble each box. For speed, pin the pieces together first with a brad nailer, then reinforce with counter-sunk screws. The back stretchers are installed last to keep the back open for wiring.
- Build the drawer boxes: Use the same plywood to build your drawer boxes. A simple trick for sizing is to use a 3/16" spacer block on each side of the drawer opening to determine the exact width for the drawer box. This accounts for the space needed for the undermount slides.
- Create the drawer fronts: Use maple lumber to build shaker-style drawer fronts. Mill the rails and styles with a router or shaper, then glue them together with a center panel.
#### ## 4. Construct the Hidden Lift Mechanism
This is the show-stopping feature. It uses a modified sit-stand desk lift.
- Build a platform: Create a solid platform for the lift columns to sit on. This platform will raise the lift to the correct height (counter height, typically 36").
- Fabricate brackets: The lift mechanism needs to be firmly attached to the platform. Weld or bolt metal brackets to the underside of the lift columns. These brackets will then be screwed into the plywood platform.
- Build the inner box: Construct a 55" x 15" box that will sit on top of the lift mechanism. This box will house the secret compartments.
- Install the lift: Mount the lift columns to the platform, then attach the inner box to the top of the lift columns. Test the up-and-down motion.
- Wire the system: The two lift columns are linked digitally via a control box. Hide this control box and the power supply inside one of the island's drawers. Drill a hole in the drawer to run the cables.
#### ## 5. Create the Secret Compartments
The inner box is divided into three sections: one for watches, one for knives, and one for other items.
- Watch section (Center):
- Build a grid system from walnut to hold individual watches.
- Cut small walnut blocks and wrap them in soft leather.
- Glue a strong magnet into the block and a corresponding magnet into the grid.
- The watch strap wraps around the leather block, and the magnet holds it securely in place.
- Knife section (Side):
- Install a leather-covered panel on the back wall of this section.
- Add small wooden shelves in front of the panel.
- Embed magnets into the back of the shelves to hold knives in place when the lift is in motion.
- Lighting:
- Route a channel into the top of the inner box to install LED light strips with diffusers. This will illuminate the contents when the island is raised.
#### ## 6. Final Assembly and Finishing
- Finish the countertop: Sand the walnut countertop to 120 grit, round over the edges, and apply a clear lacquer coat.
- Build the end panels: Create panels to cap the ends of the island. These will hide the lift mechanism and the open carcass.
- Install the island: Move the island into the closet. Level the base (you may get lucky and find the floor is perfectly level).
- Mount the countertop: Attach the finished walnut top to the island base.
- Install drawer fronts: Attach the shaker-style drawer fronts to the drawer boxes. Adjust the gaps for a perfect fit, then secure them from the inside.
- Connect the power: Plug in the lift mechanism and LED lights. Use zip ties to tidy up all cables behind the drawers.
Tips for Success
- Plan for the lift mechanism early. The dimensions of your inner box and the height of your platform are entirely dependent on the specific lift columns you buy. Mock everything up before cutting expensive walnut.
- Use pre-finished plywood. This single decision saves you days of sanding, priming, and painting the inside of your cabinets. It's a game-changer for speed.
- Test your hidden features. Before installing the island, test the lift mechanism dozens of times. Ensure the magnets are strong enough to hold items and that nothing will fall or shift during movement.
- Don't overthink the watch holders. A simple leather-wrapped block with a magnet is elegant and effective. It’s easier to build and looks more custom than complex spring-loaded mechanisms.
- Account for cable management. The control box and wires for a sit-stand desk are bulky. Plan a dedicated drawer or cavity to hide all this hardware, and drill your cable holes before installing the drawers.
FAQ
Q: Is this project suitable for a beginner?
A: No, this is an intermediate to advanced project. While the modular closet is beginner-friendly, the custom island involves precise woodworking, welding, and electrical work. It is recommended for those with a well-equipped shop and some experience.
Q: Can I use a different type of wood for the countertop?
A: Absolutely. Walnut was chosen for its beauty and durability. You could substitute it with white oak, maple, or even a high-quality plywood with a hardwood veneer. Adjust your finishing schedule accordingly.
Q: How long did this entire project take?
A: The build was completed in about 5 days. This includes demolition, wall repair, painting, building the closet system, and constructing the custom island. A first-time builder should expect it to take a week or more.
Q: What if my floor isn't level?
A: You will need to shim the base of the island. Build a simple, adjustable base or use plastic shims under the platform to level the entire island before installing the countertop. This is a common step in any cabinet installation.
More Lifestyle Articles
