What You'll Need
Here's the tutorial based on the raw content you provided.
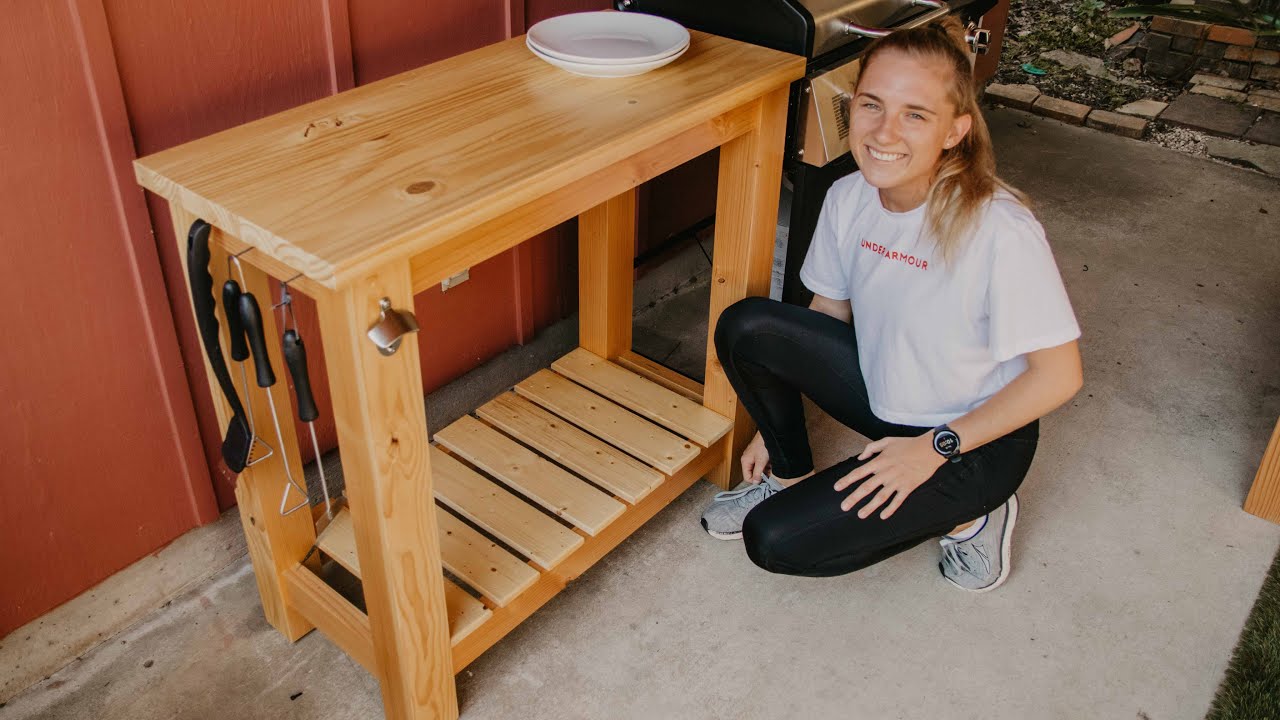
# Build This Simple Grill Cart for Your Patio
My patio is finally done, and with football season coming up, I needed a grill cart. This project is super simple and uses basic lumber. Here’s how I built mine.
- Lumber:
- 4x4s (for the legs)
- 2x4s (for the stretchers)
- 1x4s (for the bottom shelf slats)
- A pre-made project panel (for the tabletop)
- Tools:
- Miter saw or circular saw
- Planer (optional, but recommended)
- Pocket hole jig
- Drill / Driver
- Staple gun
- Clamps
- Hardware:
- Pocket hole screws
- Wood glue
- Bottle opener
- Feet for the legs
- Finish:
- TotalBoat Halcyon Amber (or your preferred outdoor finish)
Step-by-Step Guide
1. Cut Your Lumber
First, cut down your 4x4s for the four legs and your 2x4s for the top and bottom stretchers. You’ll need four long stretchers for the top and bottom of the short sides, and four more for the long sides. Don't cut the 1x4s for the bottom shelf yet—you'll want to measure that after the frame is assembled.
2. Plane the Boards (Optional but Smart)
This cart can get heavy. To keep it manageable, I ran all the boards through a planer to knock off the rounded corners. This makes them slightly smaller but removes a ton of weight.
For the 4x4s, I ripped them down to get a more rectangular leg profile. I ripped half the thickness, flipped the board over, and ripped the other half. This leaves a little ridge down the center, so run them back through the planer to clean that up. Now, cut everything to its final length.
3. Drill Pocket Holes
We’re using pocket holes for assembly. Drill pocket holes on each end of the short stretchers. For the four top stretchers (the ones that go right under the tabletop), drill three pocket holes along the long edge so you can screw the tabletop down from underneath.
4. Assemble the Sides
Build one side at a time. Take two legs and one short bottom stretcher. Attach the stretcher so it sits 3.5 inches up from the bottom of the legs. Use a spacer block to make sure it’s pushed in 3/8 of an inch from the outside edge of the legs.
Attach the top short stretcher flush with the tops of the legs. Repeat this for the other side.
5. Connect the Sides
Now, attach the long stretchers to tie the two side assemblies together. Watch your orientation here—I almost screwed one on upside down. Make sure everything is square as you go.
6. Cut and Attach the Tabletop
Measure the opening for your tabletop. Cut your project panel to size. Drop it onto the frame and screw it down through the pocket holes you drilled in the top stretchers earlier.
7. Add the Bottom Shelf
Now, grab those 1x4s. Measure the inside length of the bottom opening and cut your slats to size. Space them evenly across the bottom frame and staple them down. Make sure everything is square before you shoot the staples.
8. Finish It Up
I used TotalBoat Halcyon Amber for the finish. It looks great. If you spray it, move the cart to a spot where you don't mind getting overspray on the ground. I didn't think about it and ended up with a dusting of finish on the dirt under the legs.
After the finish dried, I added a bottle opener and some small feet to lift the cart off the ground.
That’s it. Now you can roll it out, fire up the grill, and enjoy the patio.


