How to Make Three Easy 4th of July T-Shirts for Kids
Here is a DIY tutorial based on the transcript you provided.
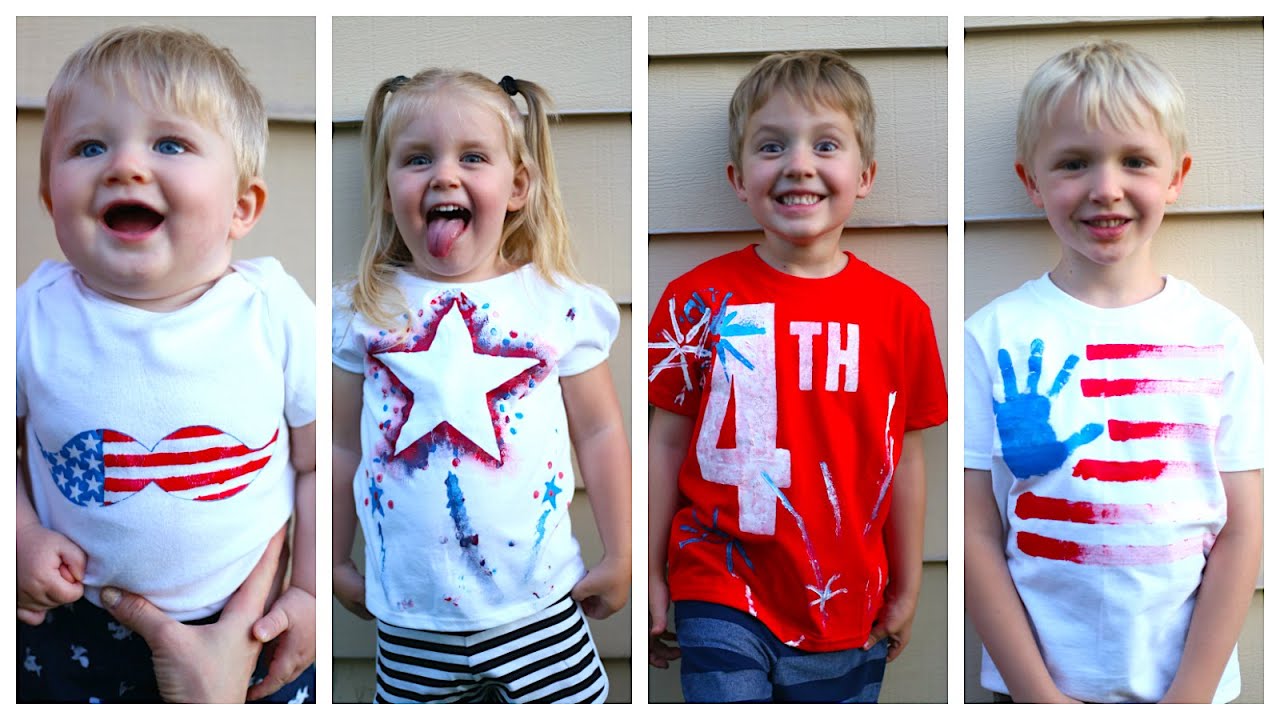
This tutorial will guide you through creating three different, fun, and festive 4th of July t-shirts using simple techniques like stencils, handprints, and straw painting. These are perfect for getting the kids involved in the holiday fun.
What You'll Need
- Materials:
- Plain cotton t-shirts (one for each design)
- Fabric paint (red, white, and blue) – ensure it is suitable for fabric
- Sticker paper (for printing stencils)
- Small star stickers
- White paper or cardstock
- Painter’s tape
- Tools:
- Computer and printer
- X-Acto knife
- Cutting mat or board
- Disposable paintbrushes (small and medium)
- Drinking straws (bendable ones work best)
- Clear tape (to hold straws together)
- Pencil (for dot painting)
- Paper towels
Step-by-Step Guide
#### ## Design 1: Star Dot Shirt
Step 1: Create the Star Stencil
Print a star shape onto a sheet of sticker paper. Place the sticker paper on a cutting mat and use an X-Acto knife to carefully cut out the star.
Step 2: Apply the Stencil
Peel the backing off the star sticker and place it in the center of the t-shirt. Press down firmly to ensure the edges are sealed so paint cannot bleed underneath.
Step 3: Paint the Dots
Pour some red and blue fabric paint onto a plate. Dip the eraser end of a pencil into the red paint. Use it to make dots all over the exposed fabric area around the star stencil. Repeat with the blue paint.
Step 4: Reveal the Design
Allow the paint to dry completely. Carefully peel off the star stencil to reveal the crisp, white star in the middle of your colorful dots.
#### ## Design 2: Handprint Fireworks Shirt
Step 1: Paint the Handprint
Paint your child's hand completely with blue fabric paint. Carefully press the painted hand onto the center of the t-shirt. Hold it in place for a few seconds, then lift it straight up. Wash the paint off your child's hand immediately.
Step 2: Add the "Firework" Lines
Use a small paintbrush to paint six red lines extending outward from the handprint. These lines represent the fireworks shooting out. Paint one line at the top and one at the bottom, then let your child add the rest.
Step 3: Create the Straw Tool
Take 3-4 bendable drinking straws. Bundle them together so the bendable ends are at the bottom. Use a piece of clear tape to hold the straws together tightly at the top.
Step 4: Make Firework Prints
Dip the taped ends of the straw bundle into a shallow dish of red or white paint. Press the straws firmly onto the shirt around the handprint to create a firework burst effect. You can twist the straws slightly as you lift them for a more dynamic look.
#### ## Design 3: Mustache Flag Shirt
Step 1: Create the Mustache Stencil
Print a mustache shape onto sticker paper. Cut it out using an X-Acto knife and a cutting mat.
Step 2: Apply Stencil and Stars
Peel and stick the mustache stencil onto the shirt. Place small star stickers on the top curve of the mustache to create the "star field" section of the flag. It's fine if the stickers overlap the stencil edge.
Step 3: Paint the Stripes
Cut a piece of white paper about ¼ inch wide to use as a straight edge. Line it up where you want your first red stripe to go. Use a small brush and red paint to paint a line along the edge of the paper. Repeat to create four red stripes on the "flag" part of the mustache. Let the paint dry.
Step 4: Paint the Mustache
Using a small brush and blue paint, carefully dab the paint onto the rest of the mustache stencil. Important: Dab the paint, don't brush it, to avoid pushing paint under the stencil. Allow the paint to dry, then peel off the stencil and all the star stickers.
Step 5: Outline for Clarity
Once the paint is dry, use a tiny paintbrush and a small amount of blue paint to carefully outline the edge of the mustache. This will give it a clean, defined shape.
Tips for Success
- Use Fabric Paint: Always check the label to make sure your paint is suitable for fabric. Acrylic paint can work but will make the fabric stiff. Fabric paint remains soft and flexible.
- Prep is Key: Do all the cutting and stencil preparation before you start painting with the kids. This keeps the project moving quickly and keeps little hands from getting bored.
- Seal the Stencils: When applying sticker stencils, press down firmly on all the edges. This prevents paint from bleeding underneath and ruining your crisp lines.
- Dab, Don't Brush: When painting over stencils, use a dabbing motion with your brush. Brushing can push paint under the stencil edge, creating a messy result.
- Let it Dry Completely: Allow the finished shirts to dry for at least 24 hours before wearing or washing. For best results, heat-set the paint by ironing the shirt on the reverse side (check your paint's instructions).
FAQ
Q: Can I use regular printer paper instead of sticker paper for the stencils?
A: Yes, you can. You will need to use painter's tape to hold the paper stencil firmly in place. Make sure the tape is pressed down on all the edges of the stencil to prevent paint from bleeding.
Q: How do I wash the shirts after making them?
A: Turn the shirts inside out and wash them in cold water on a gentle cycle. Hang them to dry or tumble dry on low heat. Avoid using fabric softener, as it can cause the paint to fade faster.
Q: My child's handprint is too big for the shirt. What should I do?
A: You can paint just a few fingers and the thumb, or simply paint the palm of the hand. You could also use a foot for a larger print! The key is to get a shape that fits the shirt.
Q: Can I use this technique for other holidays?
A: Absolutely! This is a great method for any holiday. Use a pumpkin stencil for Halloween, a heart for Valentine's Day, or a tree for Christmas. Just change the colors and the stencil shape.


