What You'll Need
These mini balloon garlands are all over Instagram right now. They're smaller, cheaper, and way easier to hang than the big organic ones. Perfect for birthday parties, baby showers, or gender reveals where someone wants a nice backdrop without spending $200 on balloons.
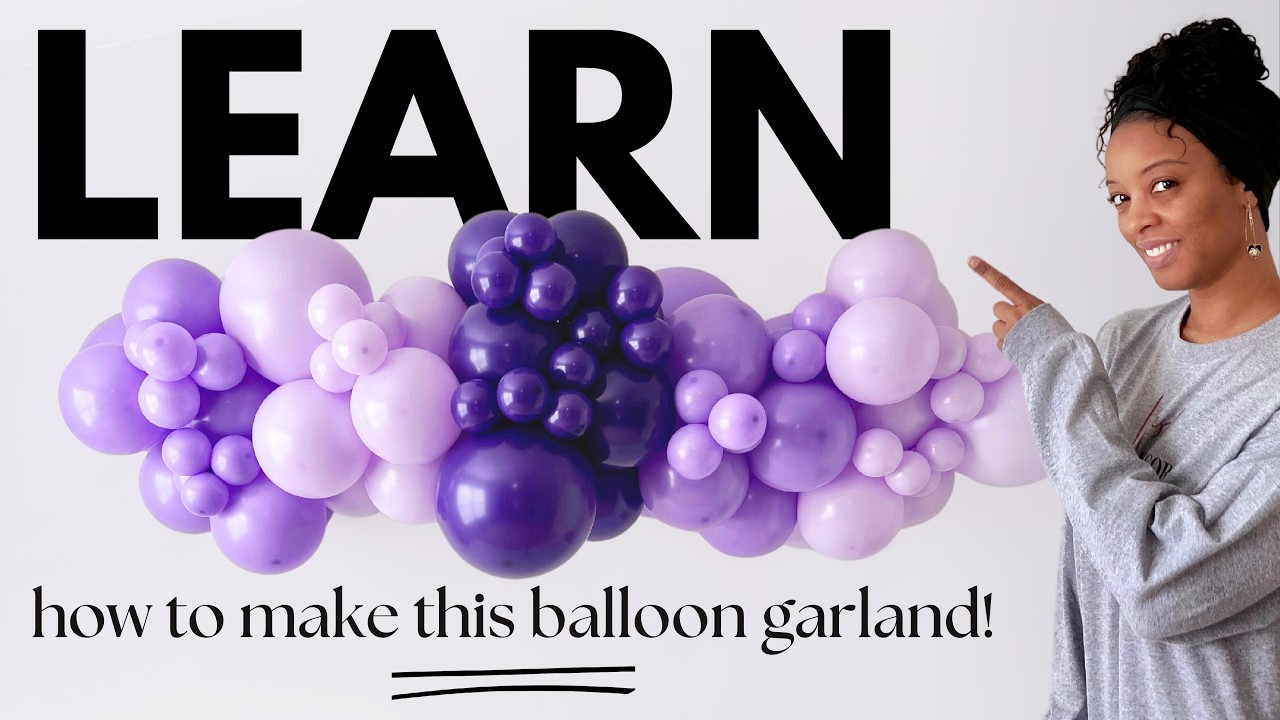
I'm using three shades of purple for mine — matte purple, lilac, and violet. Pick whatever colors work for you.
- 18-inch balloons (2 per color)
- 11-inch balloons (8 per color)
- 5-inch balloons (for filling gaps)
- 260Q balloons (the long skinny ones for tying)
- Balloon pump
- Command hooks (for hanging)
For a three-color garland like this one, you're looking at about 6 large balloons, 24 standard balloons, and a handful of 5-inch balloons. Keep it to 2-3 colors max to keep costs down.
Step 1: Make Your Balloon Quads
Blow up your balloons and tie them into quads — that's four balloons tied together. You want:
- 1 quad per color with an 18-inch balloon in the center and three 11-inch balloons around it
- 2 quads per color with four 11-inch balloons each
So for three colors, you'll have 9 quads total. The 5-inch balloons get added later to fill in gaps.
Step 2: String the Quads Together
Grab a 260Q and tie it around the first quad — start with one that has the 18-inch balloon. Leave the knot loose enough to wrap around the balloon necks.
Now add the next quad. Wrap the 260Q around the new quad and the one below it, same way you would for a regular balloon garland. Keep going in this order:
- Quad with 18-inch (color 1)
- Quad with 11-inch (color 1)
- Quad with 18-inch (color 2)
- Quad with 11-inch (color 2)
- Quad with 18-inch (color 3)
- Quad with 11-inch (color 3)
Repeat until you run out of quads. When you get to the last two, add the 11-inch quad first, then the 18-inch quad last. Tie the 260Q directly to the neck of one of the balloons to finish it off.
Important: Point your 18-inch balloons in different directions as you go. You want them facing outward, not all stacked on top of each other. One goes up, the next goes down, the next goes sideways — keeps the garland looking full from every angle.
Step 3: Fill the Gaps
Once your main garland is strung together, blow up your 5-inch balloons. Hold the garland up against the wall (or wherever it's going) and look for bare spots. Use another 260Q to tie those small balloons directly onto the garland wherever you see a gap.
Work left to right and match the colors to whatever's nearby.
Step 4: Hang It
This part's easy. Tie a 260Q into a loop, wrap it around one of the balloons on the back of the garland, and hang it on a command hook. Use two or three hooks depending on how long your garland is. That's it — no fishing line, no tape, no stress.
Final Thoughts
If you're just starting out with balloon garlands, this is a good one to practice on. It's small enough that you won't waste a ton of balloons if you mess up, but it teaches you the same skills you'll use for bigger ones. Plus clients love it because they can afford it and hang it themselves.


