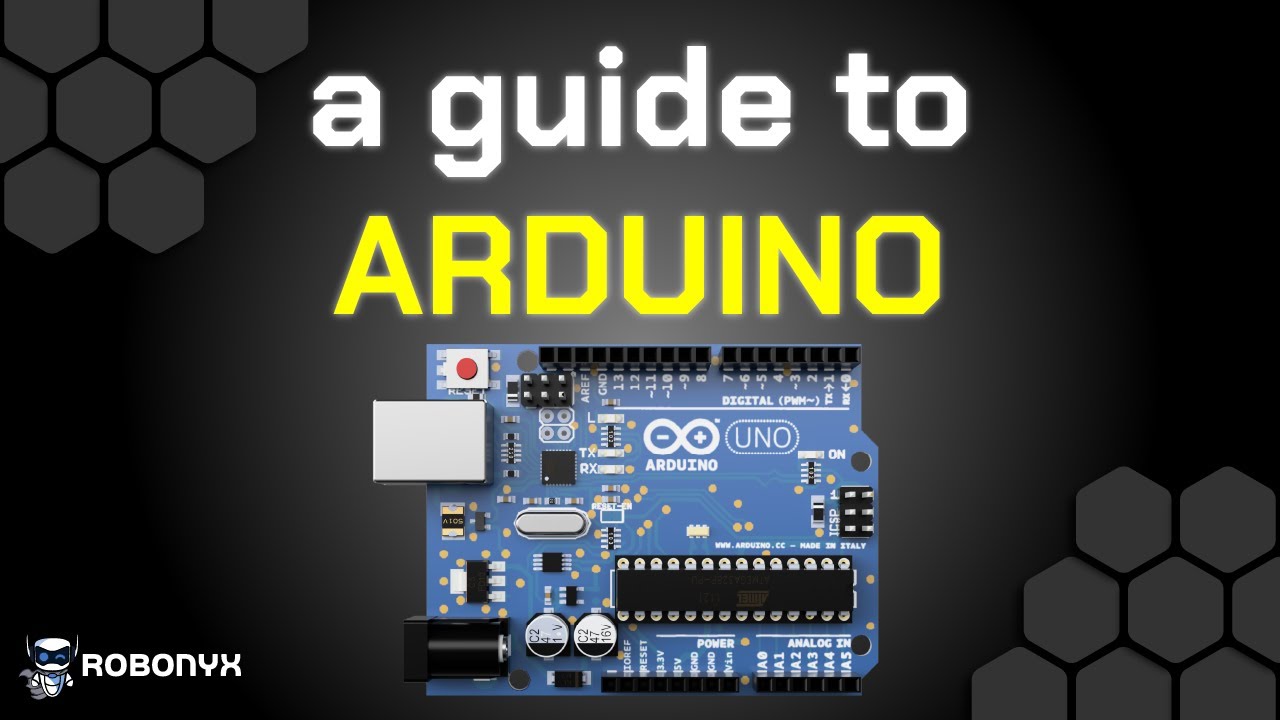
What Is an Arduino?
You want to learn Arduino. You've seen them all over YouTube and want to start building stuff. Good news: it's pretty easy. Here's everything you need to know.
This is an Arduino. It's a circuit board that acts like the brains of an electronics project. It has a bunch of pins you can connect components to — lights, motors, buzzers. You write code to program it, and it controls those components.
Arduino is also the name of the Italian company that makes them. They make several kinds:
- Arduino Uno — the standard one
- Arduino Nano — great if you're tight on space
- Arduino Mega — great if you have no space limits and want more pins
Those are the most popular classic Arduinos.
Arduino open-sources the designs for all their boards. That means anyone can access the designs for free, so plenty of other companies have cloned the schematics and layouts. These clones use the same parts as the originals with the same form factor, but they're usually cheaper and look a little different.
The Brains: The Microcontroller
At the heart of the Arduino is a microcontroller. Think of it as a mini computer that handles basic, specific tasks. The one on the Uno is called the ATmega328P — an 8-bit processor with memory to store your program and a clock speed of 16 MHz. It's made by a company called Atmel and costs about $3 on its own. But to actually use it, you need the rest of the board.
Here's what the main parts do:
- USB port — uses a Type B to A cable. Gives the board power and lets you upload code.
- USB to serial converter — translates the USB signal into serial, which is how the Arduino communicates.
- Polyfuse — stops the board from drawing too much current.
- Voltage regulator — gives the Arduino a clean 5V, and another one gives 3.3V.
- DC barrel jack — alternate power source if you don't want to use USB.
- Onboard LED — useful for basic programs and debugging.
- TX and RX LEDs — flash when data is transmitted or received.
- Reset button — resets the Arduino when you press it.
The Pins
Digital I/O Pins
The pins in this row are called digital I/O pins. I/O stands for input/output. Each pin has three modes:
- High — outputs 5V, turns a connected component on
- Low — outputs 0V, turns a connected component off
- Input — reads signals coming into the pin (useful for things like buttons)
Pins with a tilde (~) next to them can generate PWM (pulse width modulation) signals. Basically, these pins can turn on and off really fast, which lets you control things like LED brightness or motor speed. That light looks like it's on 100% of the time, but really I'm turning it on and off so fast your eyes see it as 50% power.
Power Pins
These pins power your components:
- 5V and 3.3V pins — provide stable 5V and 3.3V
- Ground pin — ground all your components
- VIN pin — lets you hook up 7-12V, and the board lowers it to 5V
Analog Input Pins
These pins measure continuous voltages — not just on/off but a whole range — and convert them into digital values. They're connected to the analog-to-digital converter (ADC). The ADC takes the continuous voltage and turns it into a digital number the microcontroller can process.
The ADC has 10-bit resolution, which gives you 1,024 different values. You map 0-5V to those values:
- 5V signal = 1023
- 2.5V signal = 512
- 0V signal = 0
Shields
If you want more functionality, you can attach a shield — a circuit board that mounts on top of the Arduino. For example, a Data Logger Shield lets you record data to an SD card. A Thinker Shield connects lights, buttons, potentiometers, buzzers, and a light-dependent resistor.
The whole point of Arduino is to use it with components, so if you're getting started, get a kit with a variety of parts.
The Software
Arduino also makes software that lets you write code and program the board easily. It's called the Arduino IDE, and the programming language is a modified version of C++.
To get it, search for "Arduino IDE" in a browser, click the first link, download Arduino IDE 2, select the right version for your computer, and follow the installation steps.
To connect your board, use the USB cable. In the dropdown menu, select "Arduino Uno USB Serial" and click to connect.
How Code Works
A program that runs on an Arduino is called a sketch. Every sketch needs two functions:
- setup() — any code between these curly brackets runs once
- loop() — any code between these curly brackets runs again and again
So if you have code one, code two, and code three in setup, and code four, code five, and code six in loop, the Arduino runs setup once, then runs loop forever: 4, 5, 6, 4, 5, 6, 4, 5, 6... until it loses power.
You'll also see grayed-out pieces of code — those are comments. They have no effect on the code. They're just annotations for the reader.
Your First Program: Blink
Let's write a simple program to blink the built-in LED on and off. This LED is connected to digital pin 13.
First, set the pin as an output (this runs once in setup):
pinMode(13, OUTPUT);
Then write the blinking sequence in loop:
digitalWrite(13, HIGH);
delay(1000);
digitalWrite(13, LOW);
delay(1000);
To upload the code, click the arrow button and wait until it says "Finished uploading." Now the Arduino will blink on and off.
Going Further
That's the most basic project. Things get way more interesting when you start connecting components. The quickest way is with breadboards and jumper wires. Here I connected an LED and a resistor to pin 13, so now it blinks an external LED too.
You can build stuff like a reaction speed game with LEDs, a buzzer, and two buttons. The game counts down from three, flashing different lights with a short buzz. When it finishes, both white LEDs turn on, and whoever presses their button first wins. The Arduino uses control structures to wait indefinitely until a button is pressed.
Or a sonar scanner — a servo motor spins an ultrasonic sensor around and checks distance. When the distance is far, the LED is green. When it's close, the LED is yellow and the buzzer makes a low sound. When it's very close, the LED is red and the buzzer makes a high sound.
That's Arduino explained in a nutshell.