What You'll Need
I used to make balloon centerpieces that only worked indoors. Lightweight bases, cute arrangements — but put them outside and one gust of wind would send the whole thing flying.
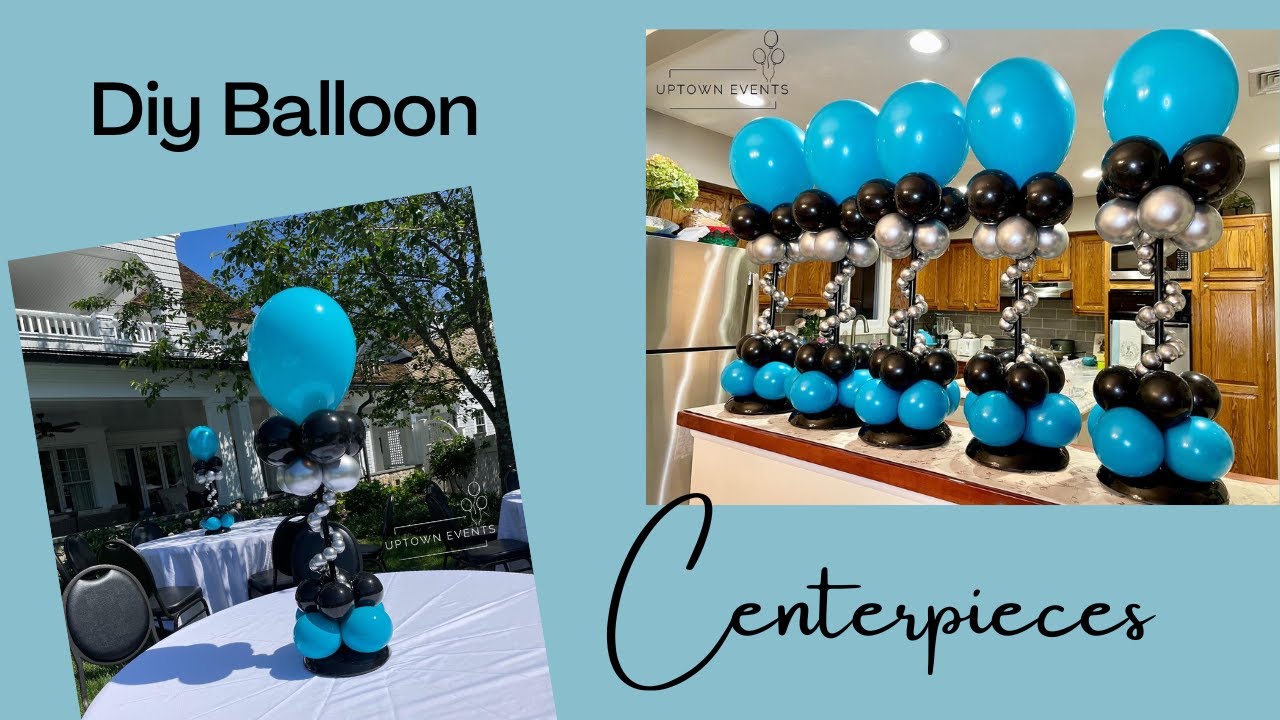
This tutorial fixes that problem. I'm building centerpieces for a cheerleading banquet (teal, gray, and black — their competition colors), and since they're going on outdoor tables, I needed something with real weight.
Here's how I put them together.
The Base:
- Lamps (Mainstay brand, about $9 each from Walmart/Target/HomeGoods — comes in a box, you build them yourself)
- These lamps have actual weight to them, which is the whole point
Balloons:
- Qualatex 11-inch balloons in tropical teal (there's a shortage, so I couldn't find smaller sizes)
- 5-inch black balloons
- 5-inch chrome silver balloons (I used Vitalites brand)
- 260 stretchy balloons in chrome/silver (called reflex silver)
Tools:
- Hand pump
- Electric pump with calibrator
- Glue dots
- Balloon stand (the one that comes with the lamp)
Step-by-Step Guide
Step 1: Build Your Lamp Base
The lamps come with stackable pieces. I used two to get the height I needed. You can adjust yours however you want — just make sure it's sturdy.
Step 2: Make Your First Quad (Teal Balloons)
These are 11-inch balloons, but I need two different sizes from the same balloon type.
For the bottom layer — the smaller teal balloons:
- Use your hand pump
- Give each balloon 4 pumps total
- Tie them off
- Make a duplet (two balloons tied together)
- Make another duplet
- Cross them to form a quad and lock them into the stand
Push down firmly so they stay snug.
Step 3: Add the Black 5-Inch Layer
These get 2 pumps each:
- Inflate your black 5-inch balloons with 2 pumps
- Create duplets
- Turn them into a quad
- Lock them onto the stand on top of the teal layer
Step 4: Add the Silver Layer
Same process — 2 pumps per balloon:
- Inflate your chrome silver balloons
- Make duplets
- Form a quad
- Lock them into place
Step 5: The Top Teal Layer (Bigger Ones)
Remember those 11-inch teal balloons? The smaller ones got 4 pumps. Now for the top layer, I want them bigger — about 4 pumps each:
- Inflate four teal balloons (4 pumps each)
- Form a quad
- Place them at the top of the stand, almost to the edge
- Grab the neck of one and interlock it with the others so nothing slides out
Step 6: The Topper
You need one more 11-inch teal balloon — this one gets inflated to 10 inches (I use my electric pump with a calibrator for this, but you can count pumps — it's about 21 pumps with a hand pump).
Here's a trick: cut a stretchy balloon in half to save product. Tie it onto the end of your big balloon to create little "tabs" or flaps. Place the balloon on top of your piece, hold down the stretchy balloon, and interlock it into your arrangement. Do this for each side.
Step 7: The Bubble Beads
Take your stretchy 260 balloon:
- Give it 3 pumps
- Start building your beads: pinch, twist, secure, repeat
- Keep going until you have enough to reach from the top to the bottom of your piece
- Tie the top to your centerpiece and swirl it in there — no glue needed for the top
- For the bottom, use a glue dot to secure the end to the base
One More Tip
Before you add the top layers, take a small black balloon and insert it on top of your base. This creates friction so your upper balloons don't slide out. Think of it like adding grip.
What It Looks Like Finished
The whole thing has an hourglass shape — wider at the bottom, narrower in the middle, wider at the top. It's heavy enough that it won't tip over outside.
My clients always love seeing these. They can't believe it's all balloons.


