What You'll Need
My daughter's been asking for a desk ever since I built one with wireless charging for myself. And yeah, I'm putty in her hands. So I built her one with a few details that make it look custom: tapered legs, cove molding, and a solid cherry top.
Here's how it went together.
Materials:
- 3/4" plywood (for sides, drawer box, back panel)
- 2x2 lumber (for legs)
- 1x2 lumber (for trim)
- Cove molding
- 1x4 lumber (for edge banding and drawer fronts)
- Solid cherry or other hardwood (for the top)
- Pocket screws (1-1/4")
- Wood glue
- Brad nails and pin nails
- Wood putty
- Semi-gloss white enamel paint
- Boiled linseed oil or polyurethane
- Drawer slides (full extension, 3/4" inset)
- Z-clips for attaching the top
- Drawer pulls
Tools:
- Miter saw
- Table saw
- Pocket hole jig (I used Kreg)
- HVLP sprayer (or brush/roller)
- Router with chamfer bit
- Clamps (lots of them)
- Brad nailer
- Biscuit joiner (optional)
- Iron for edge banding (get one from Goodwill so you don't ruin your good one)
Step 1: Build the Side Panels
Start with the legs. Cut your 2x2s to length using a stop block on your miter saw for repeatable cuts. Mark the bottom of each leg for a small taper on the inside faces.
To cut the tapers, I used a simple jig — half-inch plywood with a miter slot runner and clamps. Line up your cut mark on the edge, clamp it down, and make the first pass. Then flip the leg and cut the other face. Just think about which taper you're cutting first before you start, so you don't end up with both tapers on the same side.
I marked the legs with layout lines so I could keep them in order. When you're done, the tapers should face inward on both sides of the desk.
For the panels, cut your plywood to size and add pocket holes to the edges. I used a Kreg K4 jig for this. Lay out two legs with the tapers oriented correctly, then prop up the panel with 3/4" scraps so it sits even with the inside edge of the legs. Attach the panel with glue and 1-1/4" pocket screws.
To get that frame-and-panel look, cut top and bottom trim pieces from 1x2 to fit between the legs. Attach them with glue and brad nails. Then add cove molding around the inside of the panel. Cut a miter on one end, hold it in place, mark the other end, and cut. Work your way around until everything fits snug. Secure the molding with glue and pin nails, then fill all nail holes with wood putty.
The left side panel will be visible from under the desk, so hide those pocket holes by gluing small dowels into them. Tap them in with a hammer, let the glue dry, then cut them flush with a pull saw. It's oddly satisfying.
Step 2: Connect the Sides
Cut a full-size plywood back panel to length on your table saw sled. Add pocket holes to the edges. Cut a front stretcher to the same length, also with pocket holes.
Turn the sides upside down on your bench. Clamp the back panel in place and attach it with pocket screws. Then flip the desk on its back and attach the front stretcher. You want pocket holes going into the thick part of the mating piece, not toward the edge — that's why you flip it.
Step 3: Build the Drawer Box
The desk has two large drawers on the right side. Cut the plywood parts for the box a little long. The front edges of this plywood box will be visible, so you need to cover them with solid wood edge banding.
Cut strips from a 1x4 and glue them on. Hold them in place with painter's tape while the glue dries (or use brad nails and fill the holes). Once dry, cut the strips flush with a pull saw. The edge banding will stand a little proud, so sand it flush.
Take the panels to the desk and mark the exact size you need. Cut them to length on the table saw. The vertical panel needs a notch for the front stretcher — lay it out with a 1x2, cut it with a bandsaw, jigsaw, or handsaw, and clean up the rough edge with a chisel.
Assemble the two panels together first, then attach them to the desk. Make sure everything is square. Attach the panels to the side first, then to the top stretcher. Work your way around from there.
Cut dividers to set the opening for the narrow drawer above the seat area and to split the large drawer box in two. Cut them to size and attach with pocket screws.
Step 4: Paint the Base
With the base frame done, it's time for paint. I used a semi-gloss white enamel and applied it with an HVLP sprayer. Spraying is way faster than brushing, especially with all those nooks and crannies. Three coats, sanding between each one.
While the paint dried, I moved on to the top.
Step 5: Make the Hardwood Top
I went with cherry. It looks beautiful and holds up better than pine against a six-year-old's art projects. If you don't have a jointer and planer, you can buy wood already dimensioned or have a lumber yard do it for you.
Mill your rough lumber to size, leaving it a little long. Glue up the top with plenty of wood glue and clamp it tight. I used a lot of clamps — you can never have too many.
Let it sit overnight. The next day, take it out of the clamps, knock down the glue joints, and start sanding. Draw pencil lines across the boards — when they're gone, you know you're ready for the next grit.
Before final sanding, cut the top to size. I used a Kreg Accu-Cut track with my cordless saw. Then I added a chamfer on the underside of the front and sides using a compact router with a chamfer bit. Multiple passes to get the size I wanted. Cherry burns easily, so I cleaned up the chamfer with a block plane and scraper before hitting it with fine sandpaper.
Three coats of boiled linseed oil or polyurethane. That cherry really pops.
Step 6: Build and Install the Drawers
I've got a whole other video on my favorite way to make drawers, so I'll keep this quick. Apply veneer edge banding to the tops of the drawer boxes using a clothes iron (buy one from Goodwill so your spouse doesn't kill you). Trim the excess with a chisel or razor blade.
Cut false drawer fronts from 1x4. The large drawers are twice as tall as the narrow ones, so glue two boards together for those.
Install full extension drawer slides set back 3/4" from the front edge. Use a scrap piece of 1x4 to position the slides and a spacer to hold them off the bottom. For the narrow drawer, I used a Kreg drawer slide jig — perfect for tight spaces.
Step 7: Mount the Drawer Fronts and Top
Here's a trick I picked up from my buddy Mark at The Wood Whisperer. Drill two holes in the front of each drawer, a few inches from the side. Drill holes for the drawer hardware on the false fronts. Position the drawer fronts using playing cards as spacers. Put screws through the drawer pull holes into the drawer box to hold the front perfectly in place. Then secure it from the inside through the holes you drilled earlier. Remove those screws, drill all the way through, and install your drawer pulls. No clamping, no moving, no fuss.
For the top, cut slots in the sides, back, and front of the desk using a biscuit joiner. Install Z-clips into the slots and screw them into the top. This allows for seasonal wood movement — the top expands and contracts without cracking.
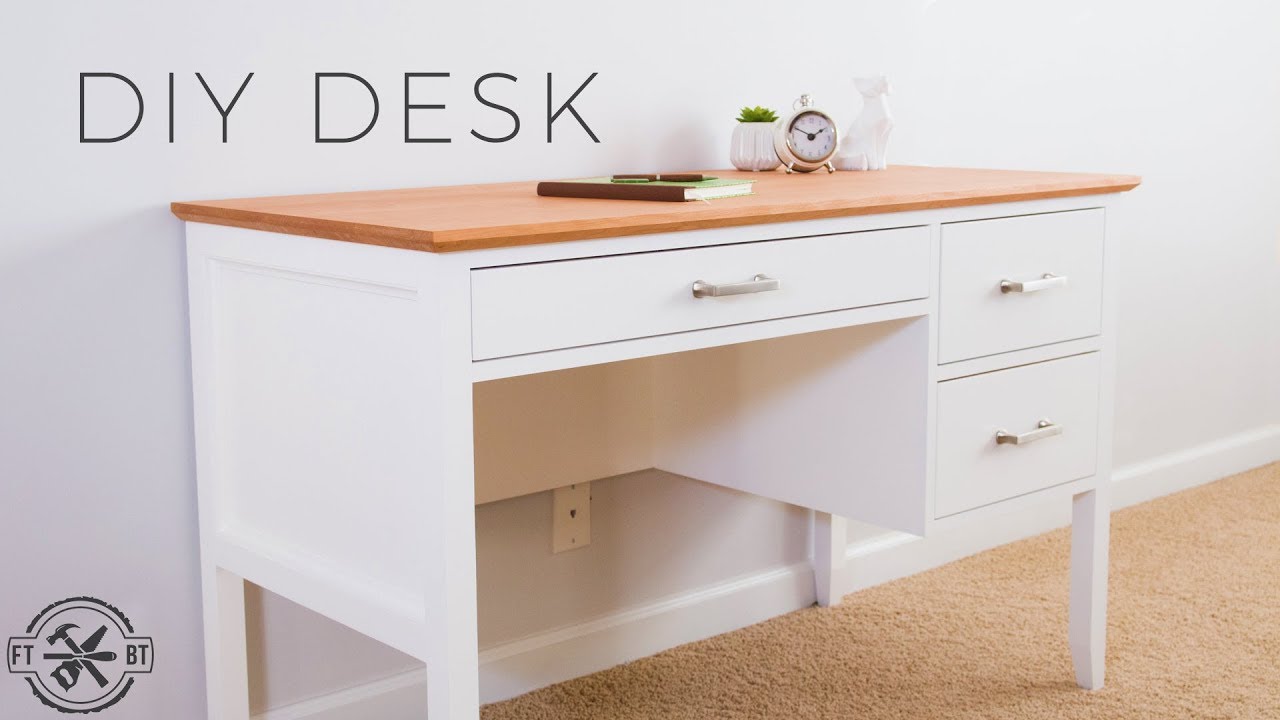
The Finished Desk
My daughter's got a desk that's built to last, with details that set it apart. And of course, now both my boys want one too. More builds coming.
If you want plans for this build, they're available in the video description. Build something awesome.


