
What You'll Need
Transform your cramped, cluttered closet into a stylish and functional space with this weekend-friendly makeover project. We'll show you how to add custom hanging rods, a vintage armoire, and clever storage solutions—all for around $500.
Tools
- Drill with large drill bit set
- Jigsaw
- Laser level
- Brad nail gun (or hammer and finishing nails)
- Screwdriver
- Tape measure
- Sandpaper or sanding block
- Paint roller and brush set
- Joint compound and putty knife
- Stud finder
- Oeder mop or broom for cleanup
Materials
- 1x4 pine board (one 8-foot piece)
- Two new clothing rods (cut to size)
- Paint (we used Sherwin Williams Antiquarian Brown)
- Painter's tape
- Drop cloths
- Joint compound (for patching holes)
- Screws and brad nails
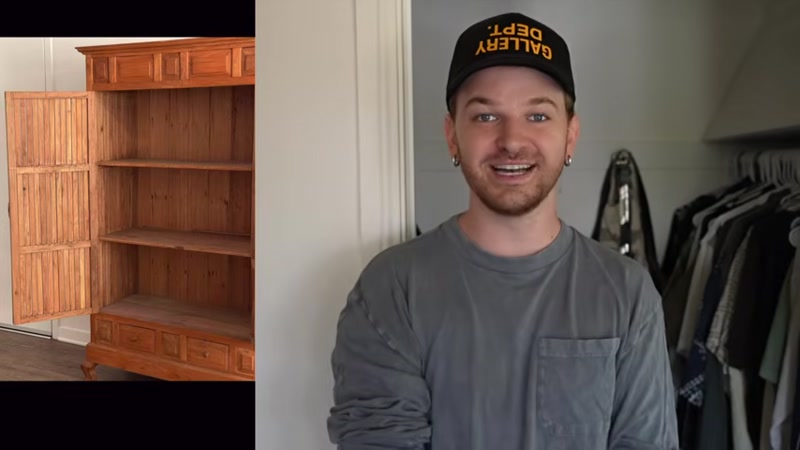
- Vintage or new armoire (we found ours on Facebook Marketplace for $400)
- Chrome or silver metal hangers (pack of 40)
- Shoe stackers (24-pack for about $30)
- Baskets for storage
- Decorative mirror and stool (optional)
- Light fixture with pull chain (if no wall switch)
- Wooden dowel (for rod placement guide)
Step-by-Step Guide
Step 1: Clear Out and Purge Your Closet

Before you start, remove everything from your closet. This is the perfect time to go through your clothes and shoes:
- Sort items into keep, donate, and sell piles
- Remove all clothing, shoes, and accessories
- Take down any existing shelves, rods, or organizers
- Patch any holes from removed hardware with joint compound
- Sand smooth once dry
Step 2: Paint the Walls
Choose a bold, unexpected color to create a cozy dressing room feel. We used a rich brown that adds warmth and depth.
- Clean walls thoroughly with a damp cloth
- Apply painter's tape around trim and ceiling edges
- Lay down drop cloths to protect floors
- Apply first coat of paint using a roller for large areas and a brush for edges
- Let dry completely (about 2-4 hours)
- Apply second coat
- Allow to dry overnight
Step 3: Build Custom Hanging Rod Brackets

Maximize your vertical space by adding two hanging rods—one for tops and one for pants/jackets.
- Cut your 1x4 board into four 15-inch sections
- Measure 12 inches from one end of each board and mark
- Use a wooden dowel (same diameter as your clothing rod) to trace a circle on each board
- Drill a hole through each board using a large drill bit matching your rod size
- On two of the boards, use a jigsaw to cut a small channel from the edge to the hole (this allows the rod to slide in and out)
- Sand all edges smooth
Step 4: Install the Hanging Rods

- Hold up a long jacket or pants to determine the ideal height for the bottom rod
- Use a laser level to mark where brackets will go
- Attach the two channel-cut brackets to the wall using brad nails to hold in place, then add screws for support
- Slide one end of the clothing rod into the channel bracket
- Lower the rod into the opposite bracket
- Repeat for the top rod, using a shorter garment as your height guide
- Add screws to both brackets for reinforcement
Step 5: Add a Top Storage Shelf
Repurpose an existing shelf or cut a new one to fit across the top of your closet.
- Measure the width of your closet
- Cut a shelf board to size
- Paint or stain to match your closet
- Install a back brace (a small piece of 1x4) on the wall for shelf support
- Place the shelf on top of the brace
Step 6: Install a New Light Fixture

If your closet has a pull-chain light, swap it for something more stylish.
- Turn off power at the breaker
- Remove old fixture
- Install new fixture with pull chain (follow manufacturer instructions)
- Turn power back on and test
Step 7: Bring in the Armoire

Position your armoire against one wall. This will be your shoe storage and accessory cabinet.
- Measure to ensure it fits flush against the wall
- Carefully move the armoire into place (get help—it's heavy!)
- Adjust feet or levelers if needed
Step 8: Organize Shoes in the Armoire
- Place boots on top and bottom shelves
- Store smaller sneakers and flats in the middle
- Use shoe stackers to double your storage capacity:
- Slide one shoe into the bottom clip
- Adjust the height clip to match your shoe size
- Stack another pair on top
- Use bottom drawers for belts, ties, and small accessories
Step 9: Hang Your Clothes
Transfer all your clothing to the new hanging rods.
- Use matching chrome or silver hangers for a cohesive look
- Hang tops on the upper rod
- Hang pants, jackets, and longer items on the lower rod
- Keep similar items grouped together
Step 10: Style and Accessorize
Add the finishing touches to make your closet feel like a boutique dressing room.
- Place a decorative tray on top of the armoire for hats or accessories
- Add a vintage mirror to an empty wall
- Place a small stool or bench for seating
- Store baskets on the top shelf for paperwork, tax documents, or seasonal items
- Add a basket for snow gear or bulky items
Tips for Success
- Measure twice, cut once — Before cutting any wood or rods, double-check your measurements. A small mistake can throw off your entire layout.
- Use a laser level for perfect alignment — This is essential for making sure your hanging rods are straight and your brackets are evenly spaced.
- Choose a dark, moody paint color — Don't be afraid to go bold in a small closet. Deep colors like brown, navy, or charcoal create a cozy, luxurious feel and make your clothes pop.
- Invest in matching hangers — Uniform hangers instantly make your closet look more organized and high-end. Chrome or silver hangers also reflect light, brightening a dark space.
- Shop secondhand for key pieces — Facebook Marketplace, thrift stores, and antique shops are goldmines for unique armoires, mirrors, and storage pieces at a fraction of retail cost.
