What You'll Need
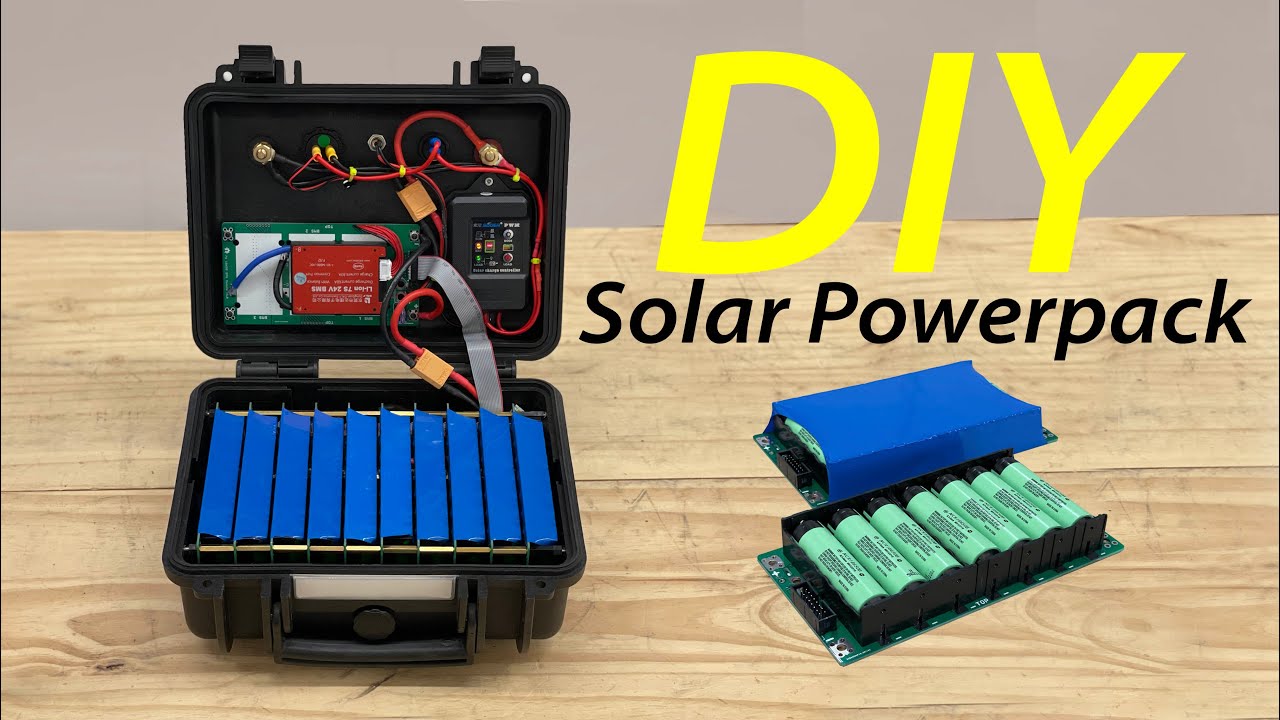
Here's how to build a 24V solar generator using those modular 18650 battery boards from Jack 35.
I've been messing with these boards for a couple of years now, and they finally make building a big battery pack something you can do in an afternoon. The key is a PCB that uses push-in cell holders — load the 18650s like you're changing TV remote batteries. No spot welding, no nickel strip mess.
You can start with a single module or stack them up to make something like this 20 kilowatt-hour system. We're building a 10-module pack that gives you about 901 watt-hours at 24 volts. That's enough to run a small fridge, lights, and charge devices for a while.
- Battery modules – populated boards with either LG MJ1 cells (3500mAh) or NCR18650B cells (3400mAh). Both are good for 5 amps continuous.
- Nylon standoffs (25mm) – these isolate the bottom of the boards so nothing shorts out
- Brass standoffs (25mm) – these pass power electrically between boards
- Ribbon cable – connects all the cell groups together
- BMS (Battery Management System) – 7S, rated for your current needs
- Pelican case (or whatever sturdy box you want)
- Solar charge controller – I used one with display and USB ports
- XT90 connector with ring terminals
- Screwdriver or small driver – hand tighten only, no power tools
- Multimeter – to check your work
Step-by-Step Guide
1. Stack the First Module
Start with the bottom board. Screw in the nylon plastic standoffs — these are isolators, so they keep the board from shorting against anything metal. Then add the brass standoffs on top of those. Brass conducts, so these will carry power from one board to the next.
Place your first populated board onto the brass standoffs.
2. Add the Second Board
Drop a second board on top of the first. The brass standoffs electrically connect the two. Use four more brass standoffs to secure it. Hand tighten only — you can snap the board if you crank it. Use a small screwdriver or a nut driver, nothing big.
3. Keep Stacking
Repeat until you have 10 boards stacked. Each board adds another parallel cell group. For a 10-module pack, you'll have 7 cells in series (7S) and 10 cells in parallel (10P) — that's 7S10P.
On the top board, use nylon standoffs again (female threads on both sides). This isolates the battery from the outside of your enclosure.
4. Add the Main Power Connector
We used an XT90 connector with ring terminals, mounted in the middle of the pack. Make sure you get the polarity right — the board has + and - markings. Connect the cable to the positive and negative pads on the top board.
5. Install the Ribbon Cable
This cable ties all the cell groups together. It connects cell 1 of board 1 to cell 1 of board 2, and so on, for all 7 groups. No matter how many boards you stack, the ribbon cable makes them act as one battery.
Once that's plugged in, your pack is electrically complete. Check it with a multimeter — you should see about 24 volts.
6. Install the BMS
This is non-negotiable. The BMS monitors each cell group's voltage. If any group drifts out of balance, it steps in and tries to fix it. If it can't, or if cells get too low or too high, it shuts everything off.
Connect your battery pack to the BMS using the XT90 connector. Then connect the ribbon cable from the BMS to the pack. The first time you connect power, you'll need to disconnect and reconnect it to wake the BMS up.
7. Drop It in the Case
I used a Pelican case, but any sturdy box works. Pre-drill four holes for the solar charge controller mounting plate. Drop the controller in, screw it down.
Connect the BMS output to the solar charge controller input. The controller I used has USB ports, a voltage meter, and two big jumbo terminals for 24V output. It also has a solar input plug.
Set the controller to "dash" mode — that keeps the load on all the time. The other modes are for street lights and stuff that need to turn off after sunset. We don't need that.
8. Wire the Load Switch
Add a switch between the controller and the USB/meter. That way you can turn off the low-power stuff when you don't need it, so the battery doesn't drain overnight. When you flip the switch on, the meter lights up and the USB ports get power.
What to Watch Out For
- Don't over-tighten the standoffs. Hand tighten only. Use a small screwdriver, not a drill.
- Cells ship at 30% state of charge, all matched voltage. That's fine — don't charge them before assembly.
- This is a 24V system, not a toy. 900 watts at 50 amps is enough to start a fire if you short it. Be careful with bare wires.
- The BMS is essential. Don't skip it. It's your safety net.
Build Time
The actual assembly of the battery pack takes about 30 minutes. The box prep (drilling holes, mounting the controller) adds maybe another 30. If you're building from scratch, give yourself two hours total.
Final Thoughts
This is the easiest way I've found to build a 1kWh battery system. The boards are modular, so you can scale up or down. You could build a tiny pack for a bike or a massive one for a house. The hard part — spot welding, balancing cells, soldering — is already done.
All the parts are linked in the description of the original video. Go build one.