What You'll Need
Here is a DIY tutorial based on the transcript provided.
# How to Throw a Stunning Themed Birthday Party on a Budget
Want to throw a beautiful themed birthday party without spending a fortune? This guide will show you how to create a gorgeous "White, Pink, and Gold" party using simple, low-cost decorations you can make yourself. From a photo backdrop to party favors, these DIY projects are perfect for a beginner and easy on your wallet.
Materials:
- Tissue paper (white, pink, and any other accent colors)
- Pink plastic tablecloth (from a dollar store)
- Balloons (white, pink, gold)
- Construction paper or Bristol board
- Foam sheets (for the numbers)
- Pool noodle or floral foam
- Fish bowl or glass vase (from a dollar store)
- Plastic wine glasses (from a dollar store)
- Small water bottles
- Paper doilies
- Gold ribbon and pink ribbon
- Gold paint (acrylic or spray)
- Painter's tape
- White liquid glue or Mod Podge
- Sugar cookies
- Powdered sugar (icing sugar)
- Corn syrup
- Vanilla extract
- Red food coloring
- Clear cellophane bags (from a bulk store)
- Popsicle sticks or shish kebab sticks
- String or stapler
- Packaging tape
Tools:
- Scissors
- Sharpie marker
- Glue gun
- Cutting knife and cutting board
- Ruler
- Toothpicks
- Baking rack and parchment paper
Step-by-Step Guide
1. Make the Tissue Paper Flowers (Daisy Variation)

These flowers are the star of the show. They are cheap, easy to make, and look fantastic in bulk.
- Prepare the paper: Stack 6 sheets of rectangular tissue paper flat and aligned. For a daisy with a center, add one smaller, different-colored sheet on top.
- Create the accordion fold: Rotate the stack so the short end is facing you. Fold a 1 to 2-inch flap forward and crease it sharply with your nail. Fold that same flap backward and crease again. Repeat this forward-backward folding until you reach the end of the paper. You should have a long, folded strip.
- Cut the petals: Loosen the folds slightly. Fold the strip in half to find the center. At the open ends (opposite the folded center), cut slits or a petal shape into the paper. Unfold the strip and then re-fold it.
- Secure the center: Fold the strip in half again. Tie the center tightly with string or secure it with a stapler. Leave a long piece of string if you want to hang the flower.
- Shape the petals: Cut your desired petal shape (round, pointed, etc.) on both open ends of the folded strip.
- Fluff the flower: This is the fun part! Gently separate each individual sheet of tissue paper, pulling it upwards and towards the center. Don't worry if it crinkles or rips a little. Continue until the flower is fully fluffed and round.
- Pro Tip: Save the paper scraps from cutting the petals. You will use them later for confetti.
2. Make the Pom-Pom Flowers (Easy Variation)

This is a simpler version of the flower that looks like a pom-pom.
- Follow steps 1-4 from the daisy flower instructions, but do not include the smaller center sheet of paper.
- When fluffing, pull each sheet more aggressively towards the center to create a round, fluffy ball shape. This hides the bare center naturally.
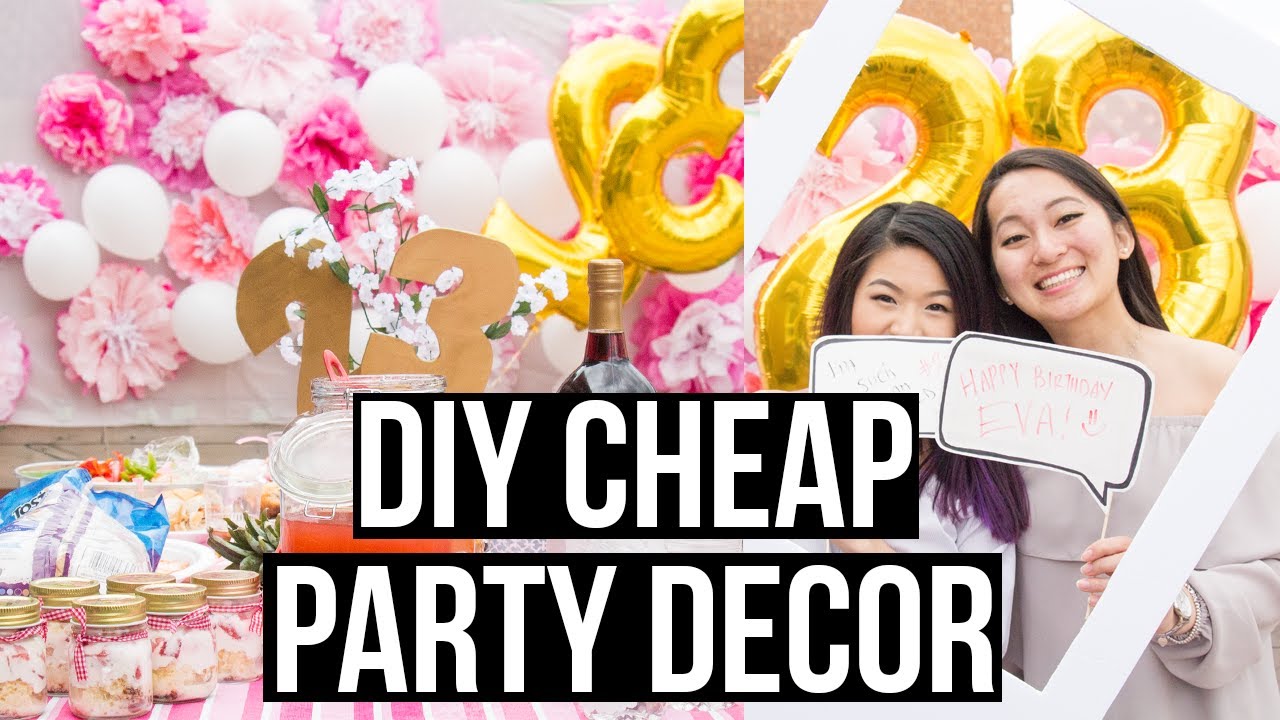
3. Assemble the Photo Booth Backdrop

This creates a stunning focal point for your party.
- Set the base: Tape a pink plastic tablecloth to a fence or wall using painter's tape.
- Add the flowers: Use packaging tape to securely attach your tissue paper flowers to the tablecloth. Start by placing them in the center and work your way out.
- Fill the gaps: Inflate your balloons and attach them to the backdrop to fill any empty spaces. This creates a full, lush wall of color.
4. Create Photo Booth Props

Guests love these, and they are simple to make.
- Sketch your designs: On construction paper or Bristol board, freehand draw shapes like lips, mustaches, glasses, or speech bubbles. Use Pinterest for inspiration.
- Cut and outline: Cut out the shapes. Use a Sharpie to add a bold outline to make them pop.
- Add handles: Glue a popsicle stick or shish kebab stick to the back of each prop.
- Make an erasable sign: Laminate a speech bubble with packaging tape so guests can write on it with a whiteboard marker.
- Create a giant photo frame: On a $2 foam board, sketch a large rectangle. Use a ruler and cutting knife to cut out the center. This creates a frame for guests to stand behind.
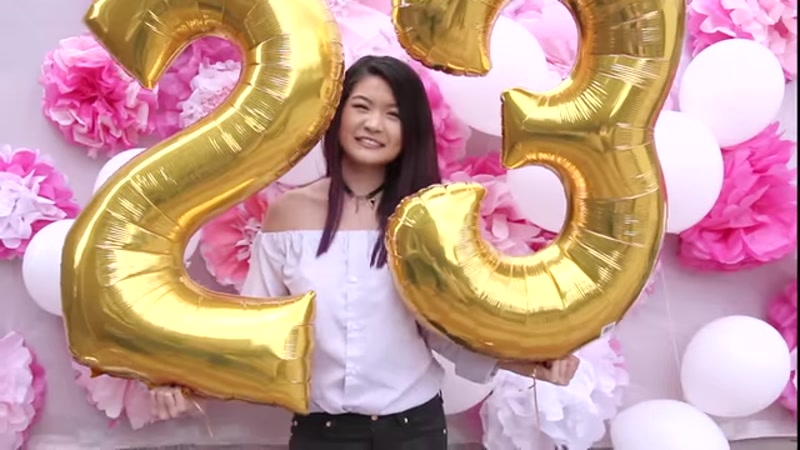
5. Design the Table Centerpiece
This elegant piece uses the confetti and pool noodle for a professional look.
- Make the confetti: Take the tissue paper scraps from your flowers and cut them into small, irregular pieces. Set aside.
- Prepare the vase: Place a piece of pool noodle or floral foam inside your fish bowl or vase. It should fit snugly.
- Hide the foam: Wrap the foam with double-sided tape and cover it with tissue paper that matches your theme. Stuff it back into the vase.
- Make the gold numbers: Sketch the numbers "2" and "3" on a foam sheet. Cut them out. Glue the numbers onto a second foam sheet with a shish kebab stick sandwiched between them for support. Cut out the final number shape and paint it gold. Let it dry completely.
- Assemble: Stick the gold numbers into the foam in the vase. Arrange your tissue paper flowers around the numbers. Pour the confetti around the base to hide the foam and add color. Tie a gold ribbon around the vase for a finishing touch.
6. Decorate the Drinking Cups

A simple paint job transforms dollar store glasses into elegant partyware.
- Tape the glasses: Use painter's tape to mask off the top rim and the inside of the plastic wine glasses. You want to paint only the bottom stem and base.
- Paint the base: Apply 2-3 coats of gold paint to the bottom of the glasses. Let it dry completely between coats.
- Seal (optional): If your paint doesn't dry to a hard, plastic-like finish, seal it with a coat of Mod Podge or white glue.
- Remove the tape: Carefully peel off the painter's tape.
7. Make Extra Party Favors (Water Bottles & Cookie Flags)

These small touches make the party feel special.
- Water bottles: Remove the labels from small water bottles. Use double-sided tape to attach a paper doily to the bottle. Wrap a piece of gold ribbon around the middle of the doily to secure it.
- Food flags: Cut a piece of pink ribbon. Fold it in half. Place a toothpick in the middle of the fold and glue the two halves of the ribbon together with a hot glue gun. Once dry, cut the end of the ribbon into a "V" shape to make a flag.
8. Make Marbled Sugar Cookies

These look professional but are incredibly easy to make.
- Make the icing: Mix 1/4 tsp vanilla extract with 2 tbsp of water. In a separate bowl, sift 1 cup of powdered sugar. Add the vanilla mixture and 2 tbsp of corn syrup. Mix until smooth. The icing should be thick but pourable. Add a little water if needed.
- Color the icing: Scoop a small amount of the white icing into a separate bowl. Add a drop of red food coloring and mix to make pink icing.
- Marbling: Dip a sugar cookie into the white icing, coating the top. Immediately, use a toothpick to drop small dots of the pink icing onto the white surface. Swirl the toothpick gently through the pink and white to create a marbled pattern.
- Let them dry: Place the iced cookies on a baking rack over a pan or parchment paper. This allows the excess icing to drip off. Let them dry completely.
- Package them: Place a dry cookie in a cellophane bag. Tie the bag closed with a pink ribbon and curl the ribbon ends with scissors for a festive look.
Tips for Success
- Start Early: Making the tissue paper flowers is the most time-consuming part. Start a week in advance so you aren't rushed.
- Use a Template: For the photo booth props and gold numbers, print out a template from your computer to trace. This ensures perfect shapes every time.
- Work in a Well-Ventilated Area: When using spray paint or strong glue, make sure you are in a space with good airflow.
- Test Your Paint: Always test your paint on a small, hidden area of your material (like the plastic cup) to ensure it adheres properly and doesn't react with the plastic.
- Buy in Bulk: Tissue paper and balloons are much cheaper when bought in multi-packs from a dollar store or online.


