What You'll Need
Here is a DIY tutorial based on the transcript provided.
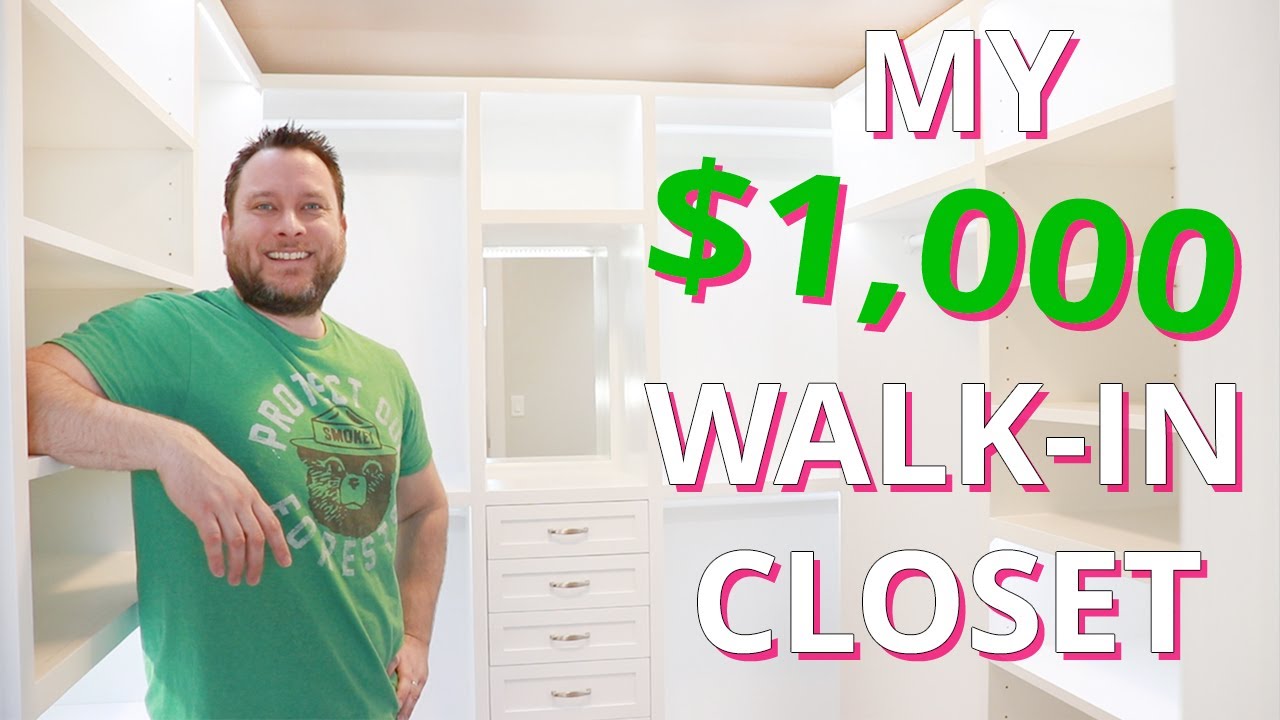
# DIY Master Closet Makeover on a $1,000 Budget
Have you ever looked at your closet and wished it had the style and organization of a high-end custom build? You don't need a contractor or a massive budget to make it happen. This guide will walk you through transforming a basic, empty room into an amazing master closet for just $1,000 in materials. We’ll show you how to build custom wardrobe boxes, install lighting, and get that classic, clean look you’ve always wanted.
Materials:
- Plywood sheets (for boxes, shelves, and face frames)
- 2x4 lumber (for the base platform)
- Wood glue
- Brad nails (for nail gun)
- Pocket hole screws
- Wood putty
- Primer and paint (your choice of color)
- Metal closet rods and mounting brackets
- LED strip lighting kit (controller, power supply, jumper cables, solderless connectors)
- Backer panel material (for the back of the wardrobes)
- Screws and anchors for wall mounting
Tools:
- Miter saw or circular saw with a guide
- Drill/driver
- Brad nailer
- Pocket hole jig (e.g., Kreg Jig)
- Clamps
- Measuring tape
- Level
- Sander or sandpaper
- Paintbrushes and rollers
- Stud finder
Step-by-Step Guide
Step 1: Prepare the Room and Build the Base Platform
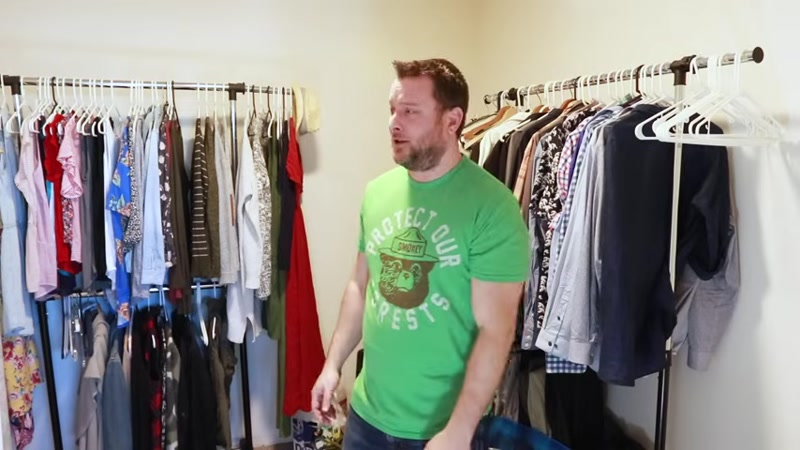
First, clear the room completely. Remove all clothes, temporary shelving, and carpet. You want a blank canvas.
Next, build a base platform for your wardrobes. Cut 2x4 lumber to create the outer rails and inner supports for your platform. The platform elevates your closet off the ground for a more finished, built-in look. Assemble the frame using screws. You will likely need to build two or three of these frames depending on the size of your closet. Once complete, bring them upstairs and install them in the closet, securing them to the subfloor.
Step 2: Cut and Paint the Plywood
Measure the height and depth of your closet to determine the dimensions of your wardrobe boxes. Cut your plywood sheets to the correct width for your box sides, tops, and bottoms.
Because there is a lot of surface area to cover, it is much faster to paint the plywood before you assemble the boxes. Lay all the cut pieces flat on sawhorses or a drop cloth. Apply a coat of primer, let it dry, then apply two coats of paint, letting each coat dry completely. This ensures a smooth, professional finish.
Step 3: Cut Panels to Size with a Miter Saw
If your miter saw is not wide enough to cut a full panel in one pass, use a two-step technique.
- Make the first cut as far as the saw blade will reach.
- Without moving the board, flip it over and make the second cut. The two cuts will meet, creating a clean, straight line.
Pro Tip: Pay attention to weight distribution. If the longer part of the board is twisting, use a clamp or apply pressure to keep it aligned during the second cut.
Step 4: Assemble the Wardrobe Boxes
Now it’s time to turn your cut panels into boxes. Apply a bead of wood glue to the edges of the panels that will join together. Use a brad nailer to tack the pieces in place; this holds them steady while you work.
Next, clamp the joints together. Using a pocket hole jig, drill pocket holes and drive pocket hole screws into the joints. This creates a very strong, rigid connection. Repeat this process to build a bottom box and a top box. Attach the back panel to keep the box square. Finally, join the bottom and top boxes together with glue and brad nails to create a double-height wardrobe.
Step 5: Install the Wardrobes and Secure Everything
Bring your assembled wardrobe boxes into the closet and place them on the base platform. Position them exactly where you want them.
Secure the boxes to the base platform, to each other, and to the wall. Use screws driven into wall studs for maximum stability. This step ensures your closet is safe and will not shift over time.
Step 6: Install the Face Frame and Lighting
The face frame is the front trim of your closet that gives it a finished, built-in look. Cut and install the face frame pieces using glue and brad nails.
For the lighting, use a quality LED strip system with a controller and remote. Connect the power supply to the controller (V+ terminal). Connect the LED strips to the correct terminals (e.g., 60 Kelvin goes to one terminal, 30 Kelvin goes to another). Use jumper cables between cabinets to connect the lights. Solderless connectors make this process much easier.
Step 7: Fill Gaps, Paint, and Install Hardware
This is the secret to a flawless finish. Fill all nail holes, wood gaps, and seams with wood putty. Let it dry, then sand everything smooth. Apply a final coat of paint to the face frames and any filled areas.
Finally, install the metal closet rods. Mount the brackets about 1.5 inches from the top of the shelf. This gives you enough room to easily hang and remove clothes. Slide the rods into place.
Tips for Success
- Paint Before You Assemble: Painting flat panels is much faster and gives a cleaner finish than trying to paint inside assembled boxes.
- Use a Brad Nailer for Alignment: A brad nailer is perfect for holding pieces in place while you drive pocket hole screws. It prevents shifting and ensures your boxes are square.
- Double-Fill and Sand: For a truly professional look, fill wood cracks and nail holes before painting, and then go back a second time to fill any new gaps that appear after the first sanding.
- Check Weight Distribution: When cutting large panels on a miter saw, always watch how the weight is distributed. A twisting board can ruin your cut or be dangerous. Use clamps or support the long end.
- Invest in Quality LED Strips: Don't buy the cheapest LED strips. Look for a brand that offers a warranty (some offer up to 15 years) to ensure your lights last and don't have quality control issues.
