What You'll Need
Here is a clear, actionable DIY tutorial based on the provided transcript.
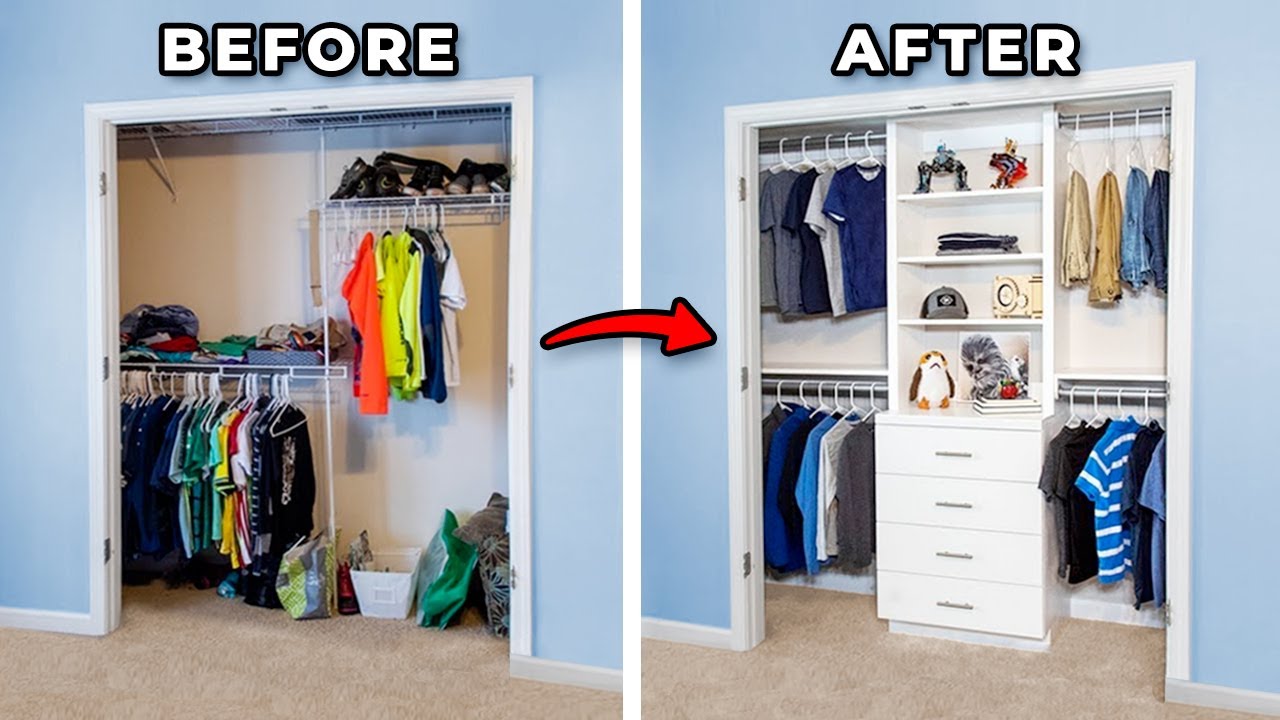
Transform Your Closet with a Custom Built-In Organizer
This guide will walk you through building a custom closet organization system, including a central dresser unit, a matching hutch, and adjustable shelving. This project is designed to maximize storage and eliminate the "junk corner" in your closet. Let's get started.
Materials:
- 3/4" plywood (Radiata pine or sanded plywood is suitable for painting)
- 1/4" plywood (for drawer bottoms)
- Solid wood trim (poplar or similar, for drawer fronts and hutch face frame)
- Full-extension drawer slides (for 4 drawers)
- Drawer pulls
- Metal closet rods
- Rod brackets
- Wall anchors (for securing to drywall)
- Wood glue
- 1-1/4" pocket screws
- 18-gauge brad nails
- Wood putty
- Primer and paint (white and your chosen color)
- Wax paper
- Dowel (for alignment pins)
- Blue painter's tape
Tools:
- Track saw or circular saw with a guide
- Table saw (optional, but recommended for easier cuts)
- Jigsaw (with a thin blade for tight curves)
- Pocket hole jig (Kreg K5 or similar)
- Drill and drill bits
- Clamps (large bar clamps recommended)
- Belt sander or sandpaper
- Putty knife
- Pliers
- Mallet
- Level
- Tape measure
- Combination square
- Nail gun (18-gauge brad nailer)
- Router with a 45-degree chamfer bit (optional, for drawer bottoms)
Step-by-Step Guide
Step 1: Remove the Old Wire Shelving
Start by clearing everything out of the closet. To remove the wire shelves without damaging the walls, follow this trick: do not just rip them out.
- Remove vertical supports: Unscrew any vertical supports from the wall first.
- Remove angled supports: Use pliers to grip the nail head of the angled support brackets and pull them straight out. This will allow the wall anchor to come out cleanly.
- Remove J-clips: For the J-style clips along the back wall, use a putty knife or screwdriver to pry the nail out of its recess. Once the nail is exposed, use pliers to pull it and the anchor out.
- Patch and sand: After all brackets are removed, patch the small holes with spackle, let it dry, and sand smooth.
Step 2: Build the Base Cabinet (Dresser)
This is the lower unit that will hold your drawers.
- Cut the carcass parts: Cut the sides, bottom, and top supports for the cabinet from your 3/4" plywood.
- Cut the toe kick: Mark a notch on the front bottom of each side panel for the toe kick. Use a jigsaw with a thin blade to make the cut.
- Cut the back notch: Cut a notch in the back of each side panel to fit around your existing baseboards.
- Assemble the carcass: Use your pocket hole jig to drill pocket holes. Attach the bottom panel to the sides. Then, attach the top supports and back supports. Use large clamps to hold everything square while you drive the pocket screws.
- Paint the interior: Apply a couple of coats of white paint to the inside front of the cabinet (the area that will be visible).
Step 3: Build and Install the Drawers
- Cut drawer parts: Cut the sides, front, and back of the four drawers to size.
- Assemble drawer boxes: Use pocket screws to join the drawer parts together.
- Install drawer bottoms: Cut the 1/4" plywood bottoms to size. Glue and nail them into a groove or onto a rabbet on the bottom of the drawer box. For a clean look, use a router with a 45-degree chamfer bit on the bottom edge of the drawer sides.
- Install drawer slides: Attach the drawer slides to the inside of the cabinet, using a spacer to ensure they are level and parallel.
- Mount drawer fronts: Drill holes for the drawer pulls. Use an 1/8" spacer at the top of the drawer front to set the reveal. Attach the front to the drawer box with a couple of screws from the inside. Open the drawer, and then permanently secure the front by driving screws through the drawer box into the front from the inside.
Step 4: Build the Hutch
This is the upper unit that sits on top of the dresser.
- Cut the sides and top: Cut the sides, top, and adjustable shelves for the hutch.
- Drill shelf pin holes: Drill a series of holes in the sides for adjustable shelf pins.
- Paint before assembly: It is much easier to paint the sides and top before assembling the hutch.
- Assemble the hutch: Clamp the top between the sides. Use wax paper between the clamps and the painted surface to prevent sticking. Secure with pocket screws.
- Add back supports: Attach the back supports to the top and bottom of the hutch.
- Build the face frame: Cut the poplar trim to size. Attach the top trim piece with glue and brad nails. Then, attach the side trim pieces, using a combination square to ensure even spacing. Fill nail holes with wood putty and paint.
Step 5: Install the System in the Closet
- Create alignment pins: To keep the hutch from shifting on the cabinet, drill a 3/8" hole into the top of the cabinet and the bottom of the hutch. Insert a dowel pin to align them.
- Install the base cabinet: Place the base cabinet in the closet. Level it, and then secure it to the wall using wall anchors into the studs.
- Fix squeaky hinges: Apply WD-40 Specialist Dry Lube to any squeaky closet door hinges to silence them.
- Install the hutch: Place the hutch on top of the cabinet, aligning the dowel pins. Secure the hutch to the wall with wall anchors. Use a compass to mark any high spots on the wall, then sand the hutch side to fit if needed.
- Install shelves and rods: Attach cleats to the wall for the upper shelves. Install brackets for the metal closet rods and cut them to size. Place the adjustable shelves in the hutch.
Tips for Success
- Save Money on Plywood: If you are painting the project, you can use a less expensive plywood like Radiata pine. Avoid the higher-grade plywood meant for staining, as you will save a significant amount of money.
- Pre-Paint for Easier Finishing: Paint all the panels and parts of the hutch before assembly. This is much faster and gives a cleaner finish than trying to paint inside corners after the unit is built.
- Use a Thin Jigsaw Blade: When cutting tight curves like the toe kick, use a thin, fine-tooth jigsaw blade. A thick blade will struggle to make the turn and may burn the wood.
- Perfect Drawer Fronts: Use the pre-drilled holes for the drawer pulls as a guide to temporarily attach the drawer front. This allows you to check the reveal and adjust it before permanently screwing it in place from the inside.
- Plan for Wall Imperfections: Old walls are rarely perfectly flat. Use a compass to trace the wall's profile onto the hutch side, then sand or cut along the line for a perfect fit.
